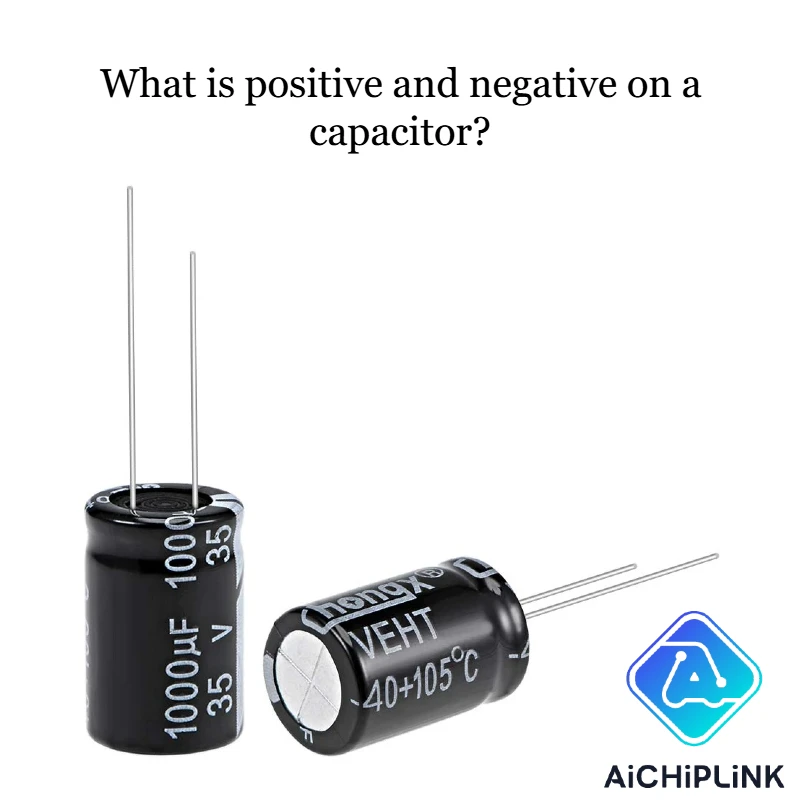
When you look at a capacitor, the positive terminal is the one connected to the higher voltage, often referred to as the positive on capacitor side. The negative terminal connects to the lower voltage. You can usually find markings that indicate which side is positive or negative. Look for a plus sign, a longer lead, or a special band. The table below shows how manufacturers mark the positive on capacitor and negative terminals:
| Indicator | Positive Terminal | Negative Terminal |
|---|---|---|
| Symbol | + sign | – sign or stripe |
| Lead Length | Longer lead | Shorter lead |
| Band/Stripe | No stripe | Stripe or arrow |
Connecting the capacitor incorrectly can cause damage. Always verify the positive on capacitor terminal and polarity before using or installing it.
Key Takeaways
-
You can find the positive terminal by looking for a plus sign, a longer lead, or no stripe. The negative terminal often has a minus sign, a shorter lead, or a stripe.
-
Always connect polarized capacitors the right way. This stops damage, overheating, or failure of the capacitor and circuit.
-
Use a multimeter or look at circuit board markings to check capacitor polarity before you install it. This helps you avoid mistakes.
-
Polarized capacitors work best in DC circuits and need to be put in the right way. Non-polarized capacitors can go in either direction and are good for AC or high-frequency uses.
-
Follow safety steps and change any swollen or leaking capacitors right away. This keeps your electronics safe and working well.
Identifying Positive on Capacitor
Markings and Symbols
To find the positive on capacitor, look for special markings. Companies use different ways to show which terminal is positive or negative. Groups like IEC, ANSI, IEEE, and IPC set rules for these markings. For example, IPC-7351B and IPC-2221 say that polarity should be clear on both the part and the circuit board.
Here are some markings you might notice:
-
A plus sign (+) shows the positive terminal.
-
A minus sign (–) or a stripe shows the negative terminal.
-
Arrows or lines can point to the negative lead.
-
A chamfered edge or an indented band can show the positive terminal.
Tip: Always look at the schematic diagram. The symbol for a polarized capacitor has a straight line with a plus sign for the positive terminal. The negative terminal is shown with a curved line. Non-polarized capacitors use two straight lines, so you do not need to worry about which way they go.
You can also check the table below for more ways companies show polarity:
| Indicator Type | Meaning | Description / Example |
|---|---|---|
| Line and short lead | Negative terminal | A line and a shorter lead mean the negative terminal. |
| Colored block on top | Negative terminal | A colored block on top marks the negative lead. |
| Line with arrows | Negative terminal | Lines with arrows point to the negative lead. |
| Indented band and + sign | Positive terminal | An indented band and plus (+) signs show the positive terminal. |
| Chamfered edge and line | Positive terminal | A chamfered edge and a line show the positive lead. |
| Chamfered edge | Positive terminal | A chamfered edge alone can show the positive terminal. |
| Line and + symbol | Positive terminal | A line and a plus (+) symbol show the positive lead, but sometimes these are hard to see. |
Lead Length and Stripes
You can also tell the positive on capacitor and negative terminal by looking at the leads and stripes. Most through-hole capacitors have two leads. One lead is longer than the other. The longer lead is the positive lead. The shorter lead is the negative lead. This is true for electrolytic capacitors.
Many capacitors have a stripe or band on the body. This stripe usually shows the negative terminal. Sometimes, arrows on the stripe point to the negative lead. Surface-mount capacitors may have a colored block or a notch to show polarity. Always connect the positive lead to the positive terminal on your circuit board.
Note: If both leads are the same length and there are no markings, the capacitor is probably non-polarized. You can connect non-polarized capacitors in any direction.
Types
Different types of capacitors use different ways to show polarity. You need to know these differences to avoid mistakes.
-
Aluminum radial electrolytic capacitors: These have a line on the negative side. The negative lead is shorter.
-
Aluminum surface-mount electrolytic capacitors: A colored part on top shows the negative pad.
-
Axial electrolytic capacitors: You will see a line with arrows pointing to the negative lead or an indented band for the positive lead.
-
Tantalum electrolytic capacitors: Surface-mount types use a line or notch on the positive end. Axial types have a notch on the positive side. Radial types may use an arrow or a positive mark above the positive lead.
-
Bolt-type electrolytic capacitors: The cover shows positive and negative pole marks. The positive electrode often has a plus sign on the sleeve.
-
Pin-type electrolytic capacitors: Positive and negative marks are on the rivets or as pits and printed marks. Some have four pins with special polarity assignments.
| Capacitor Type | Polarity Marking Features |
|---|---|
| Small Electrolytic | Negative polarity marked on casing or sleeve; long lead is positive; negative side marked with a minus sign. |
| Axial Electrolytic | Line or arrow pointing to negative lead; indented band showing positive lead. |
| Bolt-type Electrolytic | Positive and negative pole marks on the cover; no polarity marks on plastic sleeve; positive electrode marked with '+' on sleeve. |
| Pin-type Electrolytic | Positive and negative marks on rivets; pits or printed marks show polarity; some have four pins with special polarity assignments. |
Non-polarized capacitors do not have polarity markings. These types, like ceramic or film capacitors, do not have a positive terminal or negative terminal. You can connect them either way without worrying about polarity.
Remember: Always check the positive on capacitor and negative lead before you install it. This step helps you avoid damage, especially with electrolytic capacitors and tantalum electrolytic capacitors.
Capacitor Polarity
Why It Matters
You need to be careful with capacitor polarity when using polarized capacitors. Getting the direction right is not just a good idea. It is needed for safety and for the capacitor to work well. Polarized capacitors, like electrolytic ones, have a thin oxide layer inside. This layer only works if the voltage goes the right way. If you connect it backwards, the oxide layer gets ruined. When this happens, the capacitor cannot hold a charge and can become dangerous.
Here are some reasons why you must get capacitor polarity right:
-
The thin layer inside a polarized capacitor cares about voltage direction.
-
If you reverse the polarity, this layer gets damaged.
-
When the layer fails, more current leaks and heat builds up.
-
Too much heat can make the capacitor swell, leak, or even blow up.
-
Wrong polarity can also hurt other parts of your circuit.
-
It makes the capacitor wear out faster and raises its resistance.
-
Using the right polarity keeps your circuit safe and helps the capacitor last longer.
-
Always check the markings and make sure the direction matches the circuit diagram.
If you use non-polarized capacitors, you do not have to worry about polarity. These types work the same no matter how you put them in.
Tip: Always check the direction before you solder or connect a capacitor. This easy step can stop big mistakes and keep your project working well.
Risks of Reversed Polarity
Connecting a polarized capacitor backwards can cause big problems right away. If you reverse the polarity, damage starts in just a few milliseconds. The inside layer breaks down, and the voltage rating drops. The longer it stays backwards, the worse the damage gets.
Here are the most common problems if you reverse capacitor polarity:
-
Short circuit inside the capacitor
-
Too much heat builds up
-
The capacitor can swell, leak, or even explode
-
Other parts and the circuit board can get damaged
-
The capacitor will not last as long and may fail early
| Failure Mode | Description |
|---|---|
| Immediate Short Circuit | The inside layer breaks down fast when voltage is reversed, causing the capacitor to fail. |
| Excessive Heat Generation | The breakdown makes heat build up inside, which can hurt the part and the circuit board. |
| Catastrophic Failure | The capacitor might explode, leak bad stuff, or burst because of pressure inside. |
| Damage to Surrounding Circuit | Heat and electrical problems can hurt nearby parts like resistors, transistors, or ICs. |
Wrong capacitor polarity can also make power supply circuits less reliable. If you put a capacitor in backwards, the circuit might not work right or could even break. The capacitor’s resistance goes up, which can make the circuit act strange or stop working. Always use the right direction to keep your circuits safe and working well.
Non-polarized capacitors do not have this problem. You can put them in any way, and they will still work.
Note: Always match the polarity marks on the capacitor with the ones on the circuit board. Doing this helps you avoid accidents and keeps your electronics working for a long time.
Installation Tips
Avoiding Mistakes
You can stop many problems by following easy steps when you put in a capacitor. Always check which terminal is positive and which is negative before you start. Look for the longer lead because it usually means the positive side. Then, match the markings on the capacitor with the ones on the circuit board. This helps you put the capacitor in the right way every time.
Here is a simple guide to help you install capacitors safely:
-
Find the positive terminal by looking for the longer lead.
-
Check the polarity markings on the circuit board.
-
Make sure the direction is correct before you solder the capacitor.
A multimeter can help you test capacitors before you put them in. Make sure the capacitor has no charge left. Put the red probe on the positive terminal and the black probe on the negative terminal. This step checks the polarity and helps you not make mistakes. For polarized capacitors, this check is very important.
Tip: Always pick the right capacitor for your project. Choose the correct size, voltage, and type for your circuit.
Common Errors
Many beginners make the same mistakes with capacitors. One big mistake is putting a polarized capacitor in backwards. This can make the capacitor break, sometimes with a loud noise or even an explosion. Sometimes, the markings on the circuit board are hard to see, which can make things confusing.
Here are some common mistakes to watch out for:
-
Putting the capacitor leads in backwards, which can cause damage.
-
Trusting markings on the board that are not clear or are wrong.
-
Using capacitors from bad sources, which might have wrong labels.
-
Not checking the schematic or datasheet before you start.
-
Not using the right tools or skipping the polarity check.
If you put a capacitor in the wrong way, you might see it bulge, leak, or even explode. The circuit might stop working, and other parts could get hurt. Always follow safety steps, like turning off the power and wearing safety gear, when you work with capacitors.
Note: If you see a capacitor that looks swollen, leaking, or broken, change it right away. Put the new capacitor in the right way and make sure it is secure to stop future problems.
Polarized vs Non-Polarized
Key Differences
Polarized and non-polarized capacitors are not the same. These differences change how you use them in circuits. They also change how you handle capacitor polarity.
-
Polarized capacitors, like electrolytic capacitors, use special electrolytes. These materials let them hold a lot of charge in a small space. You must connect them the right way, so they work best in DC circuits.
-
Non-polarized capacitors use ceramic or film materials. You can connect them either way because they do not have a set polarity. These work well in both AC and DC circuits.
-
Polarized capacitors usually look like small cylinders. Non-polarized ones can be flat discs or rectangles.
-
Non-polarized capacitors can charge and discharge very fast. This makes them good for high-frequency and AC uses.
-
Polarized capacitors help control voltage and filter in DC circuits. Non-polarized capacitors help remove noise, smooth voltage, and improve signals in audio and communication circuits.
Note: The material inside a capacitor decides if it is polarized. Some materials, like certain polymers, need the right polarity. Materials like ceramics do not, so you can use them any way.
When to Use Each
Pick the right capacitor for your circuit’s needs. Think about the role of capacitor polarity.
-
Use polarized capacitors when you need a lot of charge for steady voltage. These are best for DC power supplies, audio amplifiers, and voltage control. Their design helps keep voltage steady and store energy.
-
Non-polarized capacitors are best when current changes direction, like in AC circuits. You will see them in noise filters, signal coupling, and decoupling. They also help start motors, filter power in renewable energy, and keep signals steady in communication devices.
Here is a table to show where non-polarized capacitors work best:
| Application Area | Role of Non-Polarized Capacitors |
|---|---|
| Filtering & Noise Suppression | Remove unwanted noise, keep voltage steady, make signals clearer in audio, communication, and power circuits. |
| Coupling & Decoupling | Let AC signals pass but block DC, stop voltage spikes, keep signals clear in audio and communication systems. |
| AC Applications & Motor Starters | Help single-phase motors start, control AC power, stop lights from flickering, smooth power in renewable energy. |
| Telecommunications | Remove noise, keep signals steady in routers, network switches, wireless systems, and satellites. |
| Automotive Electronics | Keep voltage steady in engines, safety, and entertainment; cut noise; handle tough conditions. |
| Industrial Electronics | Control power, stop spikes, keep machines and robots working right. |
| Consumer Electronics | Manage voltage and stop interference in phones, tablets, appliances, and audio devices. |
Tip: Always check the capacitor polarity before you put in a polarized capacitor. For non-polarized capacitors, you do not have to worry about polarity. This makes them easier to use in many projects.
You can figure out which side of a capacitor is positive or negative by looking for plus or minus signs. Check if one lead is longer than the other. Look for stripes on the body of the capacitor. Always put the capacitor in the right way so it does not get damaged or cause safety problems.
Quick checklist before turning on power:
-
Look at the capacitor for any polarity marks.
-
Check if one lead is longer, or use a multimeter if you are not sure.
-
Make sure the positive terminal goes to the higher voltage side.
-
Read the datasheet for more information.
Always check each capacitor before you turn on your circuit. Being careful helps keep your electronics safe and working well.
FAQ
How do you know which side of a capacitor is positive?
To find the positive side, look for a longer lead. You can also check for a plus sign (+) or see if there is no stripe on the body. The negative side usually has a stripe or a minus sign (–).
What happens if you connect a capacitor backwards?
If you put a polarized capacitor in backwards, it can get hot, leak, or even blow up. The capacitor will not work right and could hurt your circuit. Always look at the markings before you put it in.
Can you use a non-polarized capacitor in place of a polarized one?
You should not use a non-polarized capacitor when a polarized one is needed. Non-polarized capacitors cannot hold as much charge. They are better for AC circuits, not for DC power supplies.
Why do some capacitors have no polarity markings?
Some capacitors, like ceramic or film types, do not have polarity. You can put them in either way. These are called non-polarized capacitors and work in both AC and DC circuits.

Written by Jack Elliott from AIChipLink.
AIChipLink, one of the fastest-growing global independent electronic components distributors in the world, offers millions of products from thousands of manufacturers, and many of our in-stock parts is available to ship same day.
We mainly source and distribute integrated circuit (IC) products of brands such as Broadcom, Microchip, Texas Instruments, Infineon, NXP, Analog Devices, Qualcomm, Intel, etc., which are widely used in communication & network, telecom, industrial control, new energy and automotive electronics.
Empowered by AI, Linked to the Future. Get started on AIChipLink.com and submit your RFQ online today!