Introduction
Building an Arduino infrared temperature sensor enables non-contact temperature measurement for health monitoring, industrial automation, and IoT projects. This complete tutorial uses the MLX90614 infrared thermometer sensor with Arduino Uno to create a contactless temperature measurement system, covering hardware connections, Arduino code, calibration, and practical applications with real-world examples.
Components Required
Essential Parts
| Component | Quantity | Purpose |
|---|---|---|
| Arduino Uno/Nano | 1 | Microcontroller |
| MLX90614 IR Sensor | 1 | Temperature measurement |
| I2C LCD Display (16×2) | 1 | Temperature display (optional) |
| Jumper Wires | 4-8 | Connections |
| Breadboard | 1 | Prototyping |
| USB Cable | 1 | Arduino programming |
About MLX90614 Sensor
Key Features:
- Non-contact measurement: 0-5cm to 10cm range
- Temperature range: -40°C to +125°C (object), -40°C to +85°C (ambient)
- Accuracy: ±0.5°C (typical)
- Interface: I²C digital output
- Supply voltage: 3.3V or 5V compatible
- Package: TO-39 (4-pin metal can)
How It Works:
- Infrared thermopile detects IR radiation
- Internal ADC converts to digital temperature
- Factory-calibrated for ±0.5°C accuracy
- Two temperature readings: object and ambient
Hardware Setup
Wiring Diagram
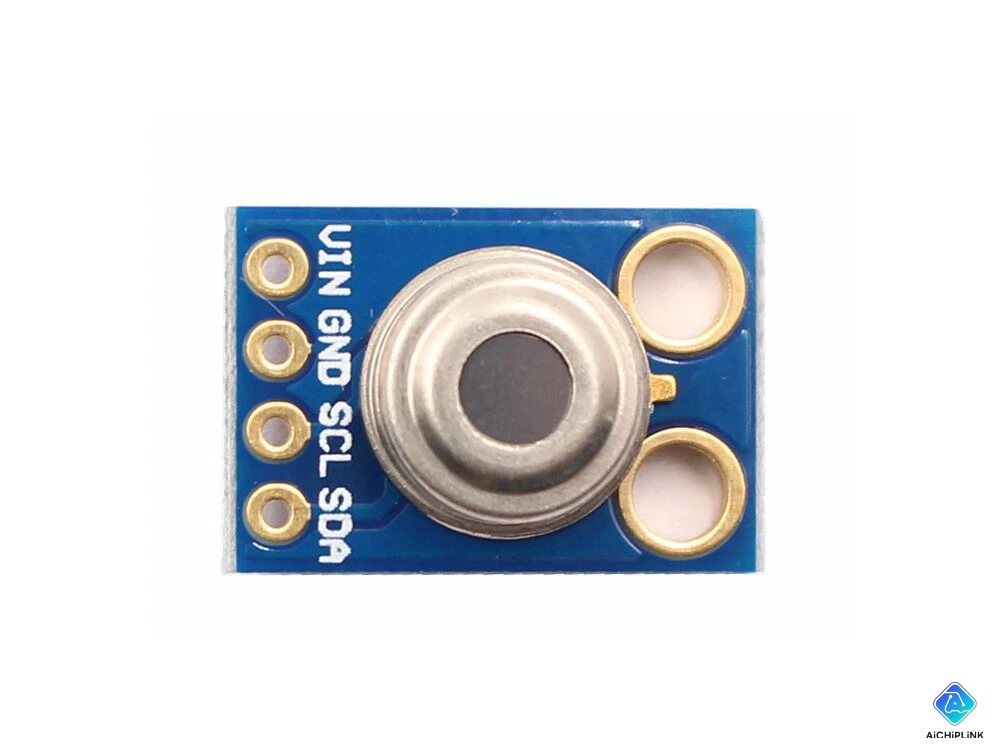
MLX90614 to Arduino Connection:
MLX90614 Pin   →   Arduino Pin
────────────────────────────────
VIN (Pin 1)    →   5V
GND (Pin 2)    →   GND
SCL (Pin 3)    →   A5 (SCL)
SDA (Pin 4)    →   A4 (SDA)

Note: Some modules include built-in pull-up resistors.
If not, add 4.7kΩ pull-ups on SCL/SDA to 5V.
Circuit Diagram:
        Arduino Uno
         ┌─────┐
     5V  │     │  A5 (SCL) ────── SCL  ┐
    GND  │     │  A4 (SDA) ────── SDA  │  MLX90614
         └─────┘                       │  IR Sensor
                              VIN  ────┘
                              GND  ────── GND
Optional: Adding LCD Display
I2C LCD (16×2) Connection:
LCD I2C Module  →  Arduino
─────────────────────────
VCC             →  5V
GND             →  GND
SDA             →  A4 (shared with MLX90614)
SCL             →  A5 (shared with MLX90614)

Note: MLX90614 and LCD can share I2C bus
(different I2C addresses: MLX90614=0x5A, LCD=0x27)
Physical Setup Tips
- Sensor positioning: Point MLX90614 at target object (5-10cm distance optimal)
- Field of view: ~90° cone; closer distance = smaller measurement area
- Avoid reflective surfaces: May cause inaccurate readings
- Stable mounting: Use tape or bracket for consistent measurements
Arduino Code
Basic Temperature Reading
Install Library First:
- Open Arduino IDE → Tools → Manage Libraries
- Search "Adafruit MLX90614" → Install
Simple Code Example:
#include <Wire.h>
#include <Adafruit_MLX90614.h>

Adafruit_MLX90614 mlx = Adafruit_MLX90614();

void setup() {
  Serial.begin(9600);

  if (!mlx.begin()) {
    Serial.println("Error: MLX90614 not found!");
    while (1);
  }

  Serial.println("MLX90614 IR Temperature Sensor");
}

void loop() {
  // Read temperatures
  float ambientTemp = mlx.readAmbientTempC();
  float objectTemp = mlx.readObjectTempC();

  // Print to Serial Monitor
  Serial.print("Ambient: ");
  Serial.print(ambientTemp);
  Serial.print("°C | Object: ");
  Serial.print(objectTemp);
  Serial.println("°C");

  delay(1000); // Update every 1 second
}
Output (Serial Monitor):
MLX90614 IR Temperature Sensor
Ambient: 25.3°C | Object: 36.8°C
Ambient: 25.3°C | Object: 36.7°C
Advanced: With LCD Display
Install LCD Library:
- Search "LiquidCrystal I2C" → Install
Complete Code with LCD:
#include <Wire.h>
#include <Adafruit_MLX90614.h>
#include <LiquidCrystal_I2C.h>

Adafruit_MLX90614 mlx = Adafruit_MLX90614();
LiquidCrystal_I2C lcd(0x27, 16, 2); // Address 0x27, 16 columns, 2 rows

void setup() {
  Serial.begin(9600);

  // Initialize MLX90614
  if (!mlx.begin()) {
    Serial.println("MLX90614 error!");
    while (1);
  }

  // Initialize LCD
  lcd.init();
  lcd.backlight();
  lcd.setCursor(0, 0);
  lcd.print("IR Thermometer");
  delay(2000);
  lcd.clear();
}

void loop() {
  float objectTemp = mlx.readObjectTempC();
  float ambientTemp = mlx.readAmbientTempC();

  // Display on LCD
  lcd.setCursor(0, 0);
  lcd.print("Object: ");
  lcd.print(objectTemp, 1);
  lcd.print("C");

  lcd.setCursor(0, 1);
  lcd.print("Ambient: ");
  lcd.print(ambientTemp, 1);
  lcd.print("C");

  // Also print to Serial
  Serial.print(objectTemp);
  Serial.print(",");
  Serial.println(ambientTemp);

  delay(500);
}
Temperature Unit Conversion
Fahrenheit Conversion:
float tempF = (tempC * 9.0 / 5.0) + 32.0;

// Example usage
float objectTempC = mlx.readObjectTempC();
float objectTempF = (objectTempC * 9.0 / 5.0) + 32.0;

Serial.print("Temperature: ");
Serial.print(objectTempC);
Serial.print("°C / ");
Serial.print(objectTempF);
Serial.println("°F");
Adding Temperature Alarm
Trigger Buzzer/LED at Threshold:
#define BUZZER_PIN 8
#define LED_PIN 13
#define TEMP_THRESHOLD 38.0 // Fever threshold (°C)

void setup() {
  pinMode(BUZZER_PIN, OUTPUT);
  pinMode(LED_PIN, OUTPUT);
  // ... other setup code
}

void loop() {
  float objectTemp = mlx.readObjectTempC();

  if (objectTemp > TEMP_THRESHOLD) {
    digitalWrite(LED_PIN, HIGH);
    tone(BUZZER_PIN, 1000); // 1kHz beep
    lcd.setCursor(0, 1);
    lcd.print("HIGH TEMP!  ");
  } else {
    digitalWrite(LED_PIN, LOW);
    noTone(BUZZER_PIN);
  }

  delay(500);
}
Applications
1. Health Monitoring
Contactless Forehead Thermometer:
- Mount sensor in handheld enclosure
- Point at forehead (5cm distance)
- Display temperature on LCD
- Alarm for fever detection (>38°C)
Arduino + MLX90614 + LCD + Battery = Portable thermometer
2. Industrial Automation
Machine Temperature Monitoring:
- Monitor motor/bearing temperature
- Non-contact prevents interference
- Data logging to SD card
- Predictive maintenance alerts
3. IoT Temperature Logger
ESP8266/ESP32 Integration:
// Send to cloud (ThingSpeak, Blynk)
WiFiClient client;
String apiKey = "YOUR_API_KEY";
client.print("GET /update?api_key=");
client.print(apiKey);
client.print("&field1=");
client.println(objectTemp);
4. HVAC Control
Smart Thermostat:
- Measure room temperature (ambient)
- Measure object temperature (occupancy detection)
- Control relay for heater/AC
- Energy-efficient heating
Troubleshooting
Sensor Not Found Error
Problem: Error: MLX90614 not found!
Solutions:
- Check I2C connections (SDA→A4, SCL→A5)
- Verify power supply (5V, GND)
- Test I2C scanner code (detect address 0x5A)
- Add 4.7kΩ pull-up resistors if missing
Inaccurate Readings
Problem: Temperature readings fluctuate or incorrect
Solutions:
- Ensure 5-10cm distance to object
- Avoid reflective/shiny surfaces
- Wait 5 seconds for sensor stabilization
- Check for heat sources nearby (sun, lamps)
- Verify emissivity setting (default 0.95 for skin)
LCD Not Displaying
Problem: LCD backlight on but no text
Solutions:
- Check LCD I2C address (0x27 or 0x3F)
- Adjust contrast potentiometer on LCD module
- Verify shared I2C bus wiring
- Test LCD separately with example code
Conclusion
Building an Arduino infrared temperature sensor with MLX90614 provides accurate contactless temperature measurement (±0.5°C) through simple I2C interface, supporting health monitoring, industrial automation, and IoT applications with minimal wiring and straightforward Arduino code, making it ideal for makers, students, and engineers creating non-contact temperature measurement systems.
Project Summary:
✅ Easy Setup: 4-wire connection (VCC, GND, SDA, SCL)
✅ Accurate: ±0.5°C factory-calibrated
✅ Non-Contact: 5-10cm optimal measurement distance
✅ Arduino Library: Adafruit MLX90614 simplifies coding
✅ Expandable: Add LCD, WiFi, alarms, data logging
✅ Affordable: ~$10-15 sensor cost
✅ Versatile: Medical, industrial, HVAC, IoT applications
Building Arduino projects? Visit AiChipLink.com for Arduino components, sensors, and maker project consultation.

Written by Jack Elliott from AIChipLink.
AIChipLink, one of the fastest-growing global independent electronic components distributors in the world, offers millions of products from thousands of manufacturers, and many of our in-stock parts is available to ship same day.
We mainly source and distribute integrated circuit (IC) products of brands such as Broadcom, Microchip, Texas Instruments, Infineon, NXP, Analog Devices, Qualcomm, Intel, etc., which are widely used in communication & network, telecom, industrial control, new energy and automotive electronics.
Empowered by AI, Linked to the Future. Get started on AIChipLink.com and submit your RFQ online today!
Frequently Asked Questions
What is the best Arduino infrared temperature sensor?
The MLX90614 is widely considered the best choice for Arduino projects thanks to its ±0.5°C accuracy, built-in calibration, and I²C interface, making it easy to integrate and highly reliable.
How accurate is the MLX90614 sensor?
The MLX90614 delivers ±0.5°C accuracy in typical conditions, especially around human body temperature. Accuracy may vary slightly at extreme temperatures or with improper distance and emissivity settings.
Can MLX90614 measure through glass?
No, the MLX90614 cannot measure through glass. It detects infrared radiation in the 8–14 µm range, which is blocked by most common materials like glass and plastic—so it reads the surface temperature instead.
How to connect multiple MLX90614 to Arduino?
By default, all MLX90614 sensors use I²C address 0x5A, so you must either: Change each sensor’s address Use an I²C multiplexer like TCA9548A to manage multiple identical devices.
What is the MLX90614 measurement range?
The MLX90614 measures object temperatures from -40°C to +125°C (higher for special variants), with best accuracy at 5–10 cm distance and direct line-of-sight.