LM35 Temperature Sensor Explained What It Does and How It Works
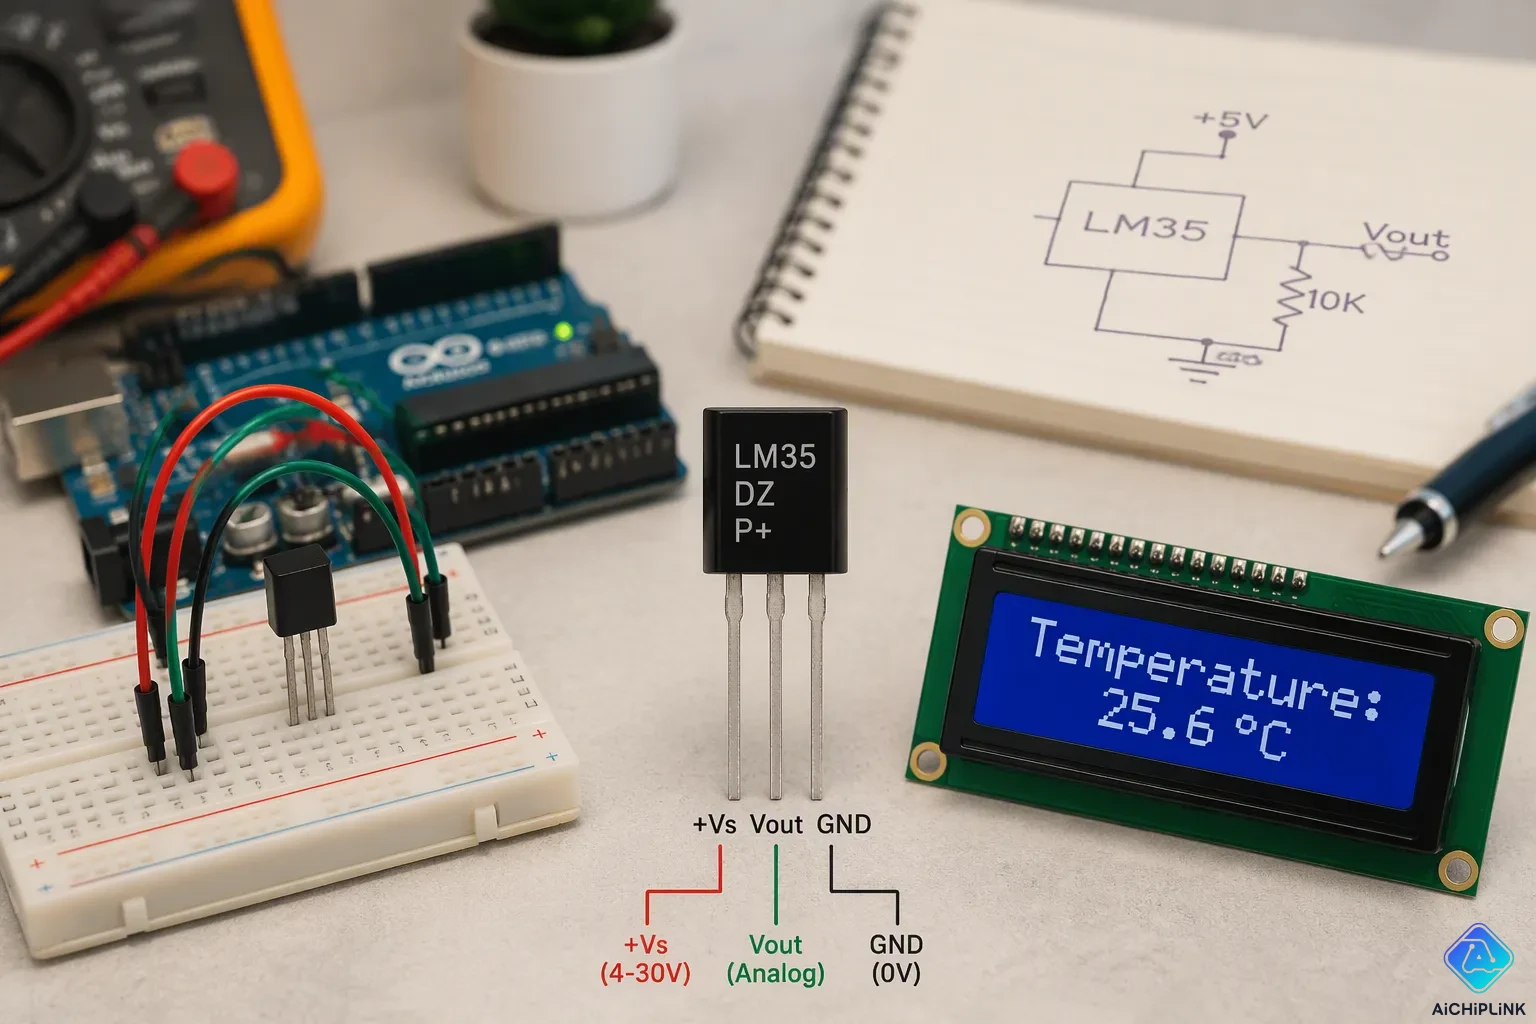
The LM35 temperature sensor is an analog device. It outputs 10mV per degree Celsius. At 0°C, the output is 0V. At 25°C, it is 250mV.
| Temperature (°C) | Output Voltage (mV) |
|---|---|
| 0 | 0 |
| 25 | 250 |
Because the response is linear, you can read it easily with a microcontroller's analog-to-digital converter. You measure the voltage, then convert it to a reading. It needs no external calibration. It offers typical accuracy of ±0.25°C at room conditions. It operates from -55°C to +150°C. You can use it with any microcontroller that has an ADC.
This post explains what the sensor is, how it works, how to wire it, and how to calculate readings.
Key Takeaways
-
The LM35 gives out 10 millivolts for each degree Celsius, so you can read the temperature straight from the voltage.
-
You can hook up the LM35 to any microcontroller that has an analog-to-digital converter, such as an Arduino.
-
To get the temperature in Celsius, divide the output voltage by 0.01, or use the formula (500 * reading) / 1024.
-
The LM35 needs no calibration and offers high accuracy, making it perfect for beginners.
-
For temperature-only projects, the LM35 is better than the DHT11 because it is more precise and can measure a larger range of temperatures.
What Is the LM35 Temperature Sensor?
The LM35 temperature sensor is a precision integrated-circuit device. Texas Instruments manufactures it today. National Semiconductor originally designed it. This sensor converts temperature into an analog voltage signal. You can measure that signal with any microcontroller that has an analog-to-digital converter.
A Linear Voltage Output for Temperature
The LM35 produces a voltage output that changes directly with temperature. For every degree Celsius, the output increases by 10mV/°C. At 0°C, the output sits at 0V. At 25°C, you will read 250mV. At 50°C, the output reaches 500mV. This relationship stays consistent across the entire functional range.
This sensor works as an analog, linear temperature sensor. The voltage rises in a straight line as temperature climbs. You do not need to build a complex circuit to interpret the signal. You simply measure the voltage and apply the conversion rule. The linearity error stays within ±1°C for the range of 0°C to +100°C. That means the reading you get matches the real temperature closely across that span.
The LM35 functions as a three terminal linear temperature sensor. It has a power pin, a ground pin, and an output pin. The output pin carries the analog voltage that represents the current temperature. You connect the power pin to a supply voltage, typically 5V. You connect the ground pin to your circuit ground. Then you read the voltage from the output pin.
LM35 Specs and Range
The LM35 measures temperature from -55 degree celsius to +150 degree celsius. That wide span covers most everyday applications. You can monitor room conditions, check battery heat, or track outdoor weather. The sensor draws very little power while operating. Its typical quiescent current is only 56 µA at 5V supply and 25°C. This low current makes the sensor suitable for battery-powered projects.
| Parameter | Value |
|---|---|
| Operating Temperature Range | -55°C to +150°C |
| Sensitivity | 10 mV/°C |
| Quiescent Current (at 5V, 25°C) | 56 µA |
| Linearity Error (0°C to +100°C) | ±1°C |
The LM35 is an inexpensive, accurate, easy-to-use temperature sensor. You can buy one for a small cost. You do not need external calibration. The sensor comes pre-calibrated in Celsius. You get reliable readings without adjusting anything.
This device qualifies as a low-power, low-cost, high-precision temperature sensor. Its accuracy of ±0.25°C at room temperature makes it suitable for many measurement tasks. The analog output gives you continuous temperature data. You can sample it as often as your microcontroller allows.
The sensor's linear behavior simplifies your code. You do not need complex lookup tables or interpolation routines. One simple formula converts voltage to temperature. You divide the measured voltage by 0.01 to get degrees Celsius. That straightforward calculation works across the entire range.
Many hobbyists choose this sensor for their first electronics projects. Its simple wiring and clear output make it approachable. You can have a working temperature monitor within minutes. The LM35 remains a popular choice for education and prototyping.
How the LM35 Sensor Works
Diode Junction Principle
The LM35 temperature sensor depends on a basic trait of semiconductor materials. Inside the sensor, a silicon diode junction sits at the center of the measuring process. This junction acts in a predictable way when temperature changes. As the temperature goes up, the forward voltage across the junction goes down. Silicon diodes have a negative temperature coefficient of about -2 mV/°C. That means the voltage drop gets smaller by roughly 2 millivolts for each degree Celsius rise.
The physical reason for this behavior comes from electron movement. Higher temperatures give electrons more energy. They move more easily across the PN junction. The energy barrier for conduction drops. The diode then needs less forward bias voltage to push the same amount of current through it. This link between temperature and voltage is steady and repeatable. Engineers can count on it for accurate measurements.
The LM35 takes this small voltage change and makes it bigger. The internal circuitry boosts the -2 mV/°C signal into a much larger and more useful output. The result is the familiar 10 mV/°C scaling you see at the output pin. This amplification happens inside the integrated circuit. You do not need any extra parts to make it work.
Analog Voltage and Temperature Measurement
The LM35 gives an analog voltage output instead of a digital signal. This output voltage is directly tied to temperature. When the temperature goes up, the voltage goes up with it. When the temperature goes down, the voltage follows. This straight-line relationship makes the sensor simple to understand and use.
The sensor turns the diode junction's response into a clean, readable signal. The internal amplifier keeps the output stable across the whole operating range. You get a voltage that changes smoothly with temperature. There are no sudden jumps or nonlinearities to worry about. The output stays linearly proportional to the temperature you are measuring.
To read this sensor with a microcontroller, you need an analog-to-digital converter. Most microcontrollers have one or more ADC pins. The ADC changes the analog voltage into digital values that software can handle. You connect the LM35's output pin to an ADC input on your board. The microcontroller then samples the voltage many times per second.
Accurate ADC reference voltage settings matter for correct readings. If the reference voltage is wrong, your temperature calculations will be off. You must know your microcontroller's ADC resolution and reference voltage. These values decide how the raw digital number turns back into a real voltage.
The conversion process follows a simple path. First, the LM35 sends an analog voltage to the microcontroller's ADC pin. Second, the microcontroller changes this voltage to temperature using the formula: Temperature (°C) = V_OUT × 100. Third, the resulting temperature value gets shown or further processed.
This working principle makes the LM35 temperature sensor great for beginners. You do not need calibration. You do not need complex math. The sensor handles all the hard work inside. Your job is simply to read the voltage and apply the conversion rule. The change in temperature shows up right away as a change in voltage. This direct link between physical temperature and electrical signal is what makes the sensor so useful for temperature measurement projects.
How to Read Temperature With an Arduino
LM35 Pinout and Wiring
The LM35 temperature sensor comes in a small three-pin package called TO-92. You need to identify each pin before connecting anything. Pin 1 is the power pin, labeled VCC. Pin 2 is the output pin, labeled VOUT. Pin 3 is the ground pin, labeled GND. The flat side of the package faces you when you read the pin labels.
| Pin | Function | Arduino Connection |
|---|---|---|
| 1 (VCC) | Positive supply | +5V |
| 2 (OUT) | Analog output (10mV/°C) | A0 |
| 3 (GND) | Ground | GND |
You connect VCC to the Arduino's 5V pin. You connect GND to the Arduino's ground pin. You connect the output pin to analog input pin A0. This wiring takes less than a minute. The sensor accepts a supply voltage from 4V to 30V, so the Arduino's 5V rail works perfectly.
Add a 0.1μF bypass capacitor between the power and ground pins. This small capacitor eliminates electromagnetic interference that could distort your readings. Place it close to the sensor for the best effect. For extra output stability, you can add an R-C damper with a 75Ω resistor and a 0.22μF capacitor between the output pin and ground.
LM35 TO-92 pinout: Pin 1 = VCC (4V–30V DC), Pin 2 = VOUT (analog output, 10mV/°C), Pin 3 = GND. Arduino wiring: VCC → 5V, GND → GND, VOUT → A0.
ADC Math for Temperature Calculation
The Arduino's analog-to-digital converter reads the output voltage from the output pin. The ADC converts this voltage into a raw number between 0 and 1023. You must translate this raw number into a meaningful temperature reading.
The conversion process involves two steps. First, convert the raw reading to millivolts using this formula: voltageOut = (sensorValue × 5000) / 1024. The 5000 represents the Arduino's 5V reference in millivolts. The 1024 is the ADC resolution. Second, divide the millivolt value by 10 to get degrees Celsius. This works because the LM35 outputs exactly 10 mV per degree Celsius.
You can simplify this calculation into one line of code. The formula temperatureC = (500 × reading) / 1024 combines both steps. This shortcut gives you the same result with less math. The voltage reading from the temperature sensor always follows this linear relationship.
int sensorValue = analogRead(A0);
float temperatureC = (500.0 * sensorValue) / 1024.0;
Serial.print("Temperature: ");
Serial.print(temperatureC);
Serial.println(" °C");
This code reads the analog output pin, calculates the temperature in celsius, and prints the result to the Serial Monitor. You can adjust the sampling rate by adding a delay between readings. The sensor responds quickly to temperature changes, so you can measure conditions in real time. The working principle stays the same regardless of your project. You read the voltage, apply the conversion, and get an accurate temperature value.
LM35 Sensor Applications and Limitations
Real-World Uses for the Sensor
You can use the LM35 temperature sensor in many practical projects. Room temperature monitoring is the most common use. You connect the sensor to an Arduino, change the voltage reading to Celsius, and show the result on a 16x2 LCD screen. This setup works well in houses, offices, and industrial spaces. You get real-time temperature data without complex wiring.
Overheat alarms are another useful application. You set a threshold voltage in your code. When the sensor output goes above that level, the system triggers a buzzer or LED. This approach protects electronics enclosures, motors, and power supplies from too much heat.
Battery temperature checks benefit from the LM35's low power draw. You can attach the sensor directly to a battery pack. The 56 µA quiescent current means the sensor barely drains your power source. Simple weather stations also use this sensor to track outdoor conditions. You can log temperature data over time and spot trends.
Several beginner-friendly projects show the sensor's versatility. You can read temperature values on the Serial Monitor with just a few lines of code. You can improve reading accuracy by taking multiple samples and averaging them. You can build a standalone thermometer using the LM35 and an I2C LCD display. Each project builds on the same basic voltage-to-temperature conversion.
Accuracy and Design Considerations
The LM35 temperature sensor gives reliable readings, but you should know its limitations. Self-heating affects accuracy slightly. The sensor uses power during operation, which creates a small amount of internal heat. This heat raises the measured temperature above the real ambient value. The effect stays minimal for most applications, but you should consider it in precision work.
The analog output needs an ADC pin on your microcontroller. You cannot connect this sensor directly to a digital input. Your board must have analog-to-digital conversion ability. Most Arduino boards include multiple ADC pins, so this rarely limits your options.
The operating range spans -55°C to +150°C. This range covers everyday needs, but it falls short of what thermocouples can measure. Thermocouples handle much higher temperatures, often exceeding 1000°C. If you need to measure extreme heat, the LM35 will not work for your project.
The sensor's accuracy of ±0.25°C at room temperature suits most hobbyist applications. You get consistent, repeatable temperature measurement without calibration. Just remember to use a stable reference voltage for your ADC. A fluctuating reference voltage adds errors to your temperature calculations.
LM35 vs. DHT11: Which Temperature Sensor Is Better?
Analog vs. Digital Output
The LM35 temperature sensor gives a steady analog signal. You read its output voltage straight from the analog output pin. This voltage changes smoothly with temperature. You turn it into Celsius using the 10mV per degree rule. The response stays linear across the whole range. You get instant readings without waiting for data processing.
The DHT11 works in a different way. It sends digital data through a single wire. You need a library to decode this signal. The DHT11 measures both temperature and humidity. It packs two sensors into one unit. This convenience comes with trade-offs in precision.
| Specification | LM35 (Analog) | DHT11 (Digital) |
|---|---|---|
| Temperature Accuracy | ±0.5°C (at 25°C) | ±2°C |
| Humidity Accuracy | Not applicable | ±5%RH |
| Resolution | Depends on ADC (about 0.49°C per step with 10-bit ADC) | Typically 1°C and 1%RH |
The LM35 offers better temperature accuracy. It also reacts faster to changes. The DHT11 provides humidity data but with lower accuracy. Your choice depends on what you need to measure.
Choosing the Right Sensor for Your Project
Pick the LM35 when you need precise temperature readings. This analog sensor works well for real-time applications. You can build temperature controllers or weather stations with it. The sensor draws only about 60µA. This low power usage causes minimal self-heating. Your readings stay accurate even in still air.
The LM35 also works in analog circuits. You do not need a microcontroller to use it. You can connect the output pin directly to a comparator or meter. This flexibility makes it useful for simple electronic designs.
Choose the DHT11 when you need humidity data too. This digital sensor works with existing Arduino libraries. You can add it quickly to your projects. It costs less and needs no soldering for basic connections. The DHT11 suits indoor climate monitoring where moderate accuracy works fine.
The LM35 temperature sensor shines in portable projects. Its minimal energy use extends battery life. You get two-decimal-point precision using just the analogRead() function. The DHT11 struggles in extreme temperatures. It only operates from 0°C to 50°C. The LM35 handles -55°C to +150°C.
For temperature-only monitoring, the LM35 wins. For combined temperature and humidity tracking, the DHT11 makes sense. Consider your project needs before choosing. Think about accuracy needs, temperature range, and whether you need humidity data. The right sensor matches your specific application.
Reading temperature with the LM35 temperature sensor comes down to one simple rule: measure the voltage and divide by 0.01. That gives you degrees Celsius directly. Check your wiring first. Confirm VCC connects to 5V, GND to ground, and the output pin reaches an analog input. Then verify your ADC conversion formula in code. A wrong reference voltage will skew every reading.
Try building a room temperature monitor as your next project. Connect the sensor to an Arduino, add an LCD screen, and display live readings. This practice reinforces the core concepts you just learned.
The LM35 remains a reliable, easy-to-use temperature sensor for anyone learning electronics. Its analog output and linear response make it perfect for beginners.

Written by Jack Elliott from AIChipLink.
AIChipLink, one of the fastest-growing global independent electronic components distributors in the world, offers millions of products from thousands of manufacturers, and many of our in-stock parts is available to ship same day.
We mainly source and distribute integrated circuit (IC) products of brands such as Broadcom, Microchip, Texas Instruments, Infineon, NXP, Analog Devices, Qualcomm, Intel, etc., which are widely used in communication & network, telecom, industrial control, new energy and automotive electronics.
Empowered by AI, Linked to the Future. Get started on AIChipLink and submit your RFQ online today!
Frequently Asked Questions
How Do I Know If My LM35 Is Wired Correctly?
Look at the flat side of the TO-92 package. Pin 1 goes to power, pin 2 goes to the analog input, and pin 3 goes to ground. If the output pin shows 0V, the sensor might be flipped. Check your wiring again before turning on the power.
Can I Use the LM35 With a 3.3V Microcontroller?
Yes, you can. The LM35 temperature sensor needs 4V to 30V to work, so 3.3V is too low. Use the 5V supply from your board instead. The output voltage stays tied to temperature no matter what supply you use, as long as you stay within the working range.
Why Does My Temperature Reading Seem Too High?
Self-heating causes this problem. The sensor uses about 56µA while running, which creates a little internal heat. This heat makes readings go up by a small amount. For better results, place the sensor away from other hot parts and let air flow around it.
What Is the Difference Between the LM35 and a Thermistor?
The LM35 gives a straight voltage output that changes by 10mV for each degree Celsius. A thermistor changes its resistance in a curved way with temperature. You need extra parts to make thermistor readings straight. The LM35 temperature sensor makes your project easier because you read voltage directly without added components.