You can quickly install NodeJS on your Raspberry Pi by using NVM. This method is flexible and works across every model. Start by updating your Raspberry Pi, then run the NVM install script. After that, use NVM to install NodeJS and select your preferred version. You can verify your setup with simple commands. This guide applies to many Raspberry Pi models and OS versions, including the latest ones. If you have specific requirements, you can also install NodeJS using NodeSource, apt, or direct binaries.
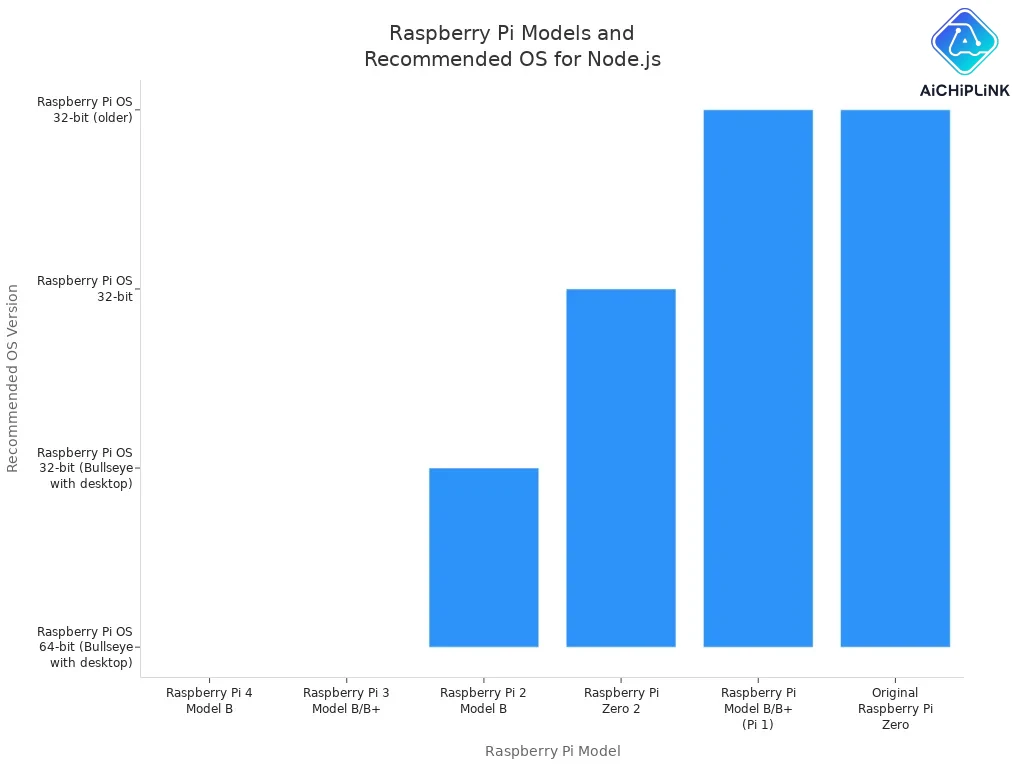
The table below shows which Raspberry Pi models and OS versions work best for installing NodeJS:
| Raspberry Pi Model(s) | CPU Architecture | Recommended OS Version | Notes on NodeJS Installation Compatibility |
|---|---|---|---|
| Raspberry Pi 4 Model B | ARMv8 (64-bit) | Raspberry Pi OS 64-bit (Bullseye with desktop) | Fully supported by NodeSource NodeJS binaries |
| Raspberry Pi 3 Model B/B+ | ARMv8 (64-bit) | Raspberry Pi OS 64-bit (Bullseye with desktop) | Fully supported by NodeSource NodeJS binaries |
| Raspberry Pi 2 Model B | ARMv7 (32-bit) | Raspberry Pi OS 32-bit (Bullseye with desktop) | Supported by NodeSource NodeJS binaries |
| Raspberry Pi Zero 2 | ARMv7 (32-bit) | Raspberry Pi OS 32-bit | Supported by NodeSource NodeJS binaries |
| Raspberry Pi Model B/B+ (Pi 1) | ARMv6 (32-bit) | Raspberry Pi OS 32-bit (older) | Not supported by NodeSource NodeJS binaries |
| Original Raspberry Pi Zero | ARMv6 (32-bit) | Raspberry Pi OS 32-bit (older) | Not supported by NodeSource NodeJS binaries |
Key Takeaways
-
Use NVM to install NodeJS on Raspberry Pi. This makes setup easy. It also lets you change versions when needed.
-
Always update your Raspberry Pi system first. This helps stop errors. It also makes the install go smoothly.
-
Check your Raspberry Pi model and CPU type. This helps you pick the right way to install NodeJS.
-
Check if NodeJS and npm work by running commands. You can also use test scripts to make sure all is good.
-
If you have problems, try some troubleshooting tips. Update your system, fix path issues, or use other install ways.
Preparation
Update Raspberry Pi
Before you begin, make sure your raspberry pi is ready. It is important to update your system first. This helps stop errors when you install things. Open the terminal on your raspberry pi. Type these commands:
sudo apt update
sudo apt upgrade -y
These commands will get the newest software for your raspberry pi. Updating helps prevent problems with nodejs or other tools. If you use raspbian os, these commands work the same way. Make sure your internet works because you need it to download files.
Here is a quick checklist for your setup:
| Requirement | Recommendation |
|---|---|
| Raspberry Pi Model | Raspberry Pi 4 or newer is best, but older ones work too |
| MicroSD Card | At least 8GB, more if your OS needs it |
| Power Supply | Use the right micro USB power supply for your Pi |
| Peripherals | You need an HDMI cable, mouse, and keyboard |
| Internet | Needed for downloading and updating software |
💡 Tip: If you want to add more tools, check that your microSD card has enough space.
Check Compatibility
You should check if your raspberry pi can use the latest nodejs. Different models have different ARM types. Most guides work for all models, but knowing your device helps you get better results.
Follow these steps to check your architecture:
-
Open the terminal on your raspberry pi.
-
Type
uname -mand press Enter. -
You will see something like
armv6l,armv7l, oraarch64.
-
Raspberry Pi Zero W uses ARMv6.
-
Raspberry Pi 2 and 3 use ARMv7.
-
Raspberry Pi 4 uses ARMv8.
When you know your architecture, you can follow the right guide for your model. Most nodejs guides help you pick the right binary for your raspberry pi. If you use raspbian, you can use the package manager or download the binary. Many people find the official nodejs docs and community guides helpful for raspberry pi and nodejs.
Note: Some npm packages may not work on every raspberry pi. If you have problems, check the guide or ask in forums for help.
Install NodeJS with NVM
NVM stands for Node Version Manager. You should use NVM when you want to install nodejs on your raspberry pi. This tool makes installing nodejs easy and flexible. Many users choose NVM because it works on all raspberry pi models and lets you switch between different versions of nodejs without trouble.
Install NVM
NVM is the best way to install nodejs on raspberry pi for several reasons:
-
You can manage many nodejs versions at the same time.
-
You do not need root access to install nodejs. NVM installs everything in your home folder.
-
You avoid system conflicts and permission problems.
-
NVM works well in multi-user setups, which is common with raspberry pi.
-
You can automate nodejs setup for every user.
To get started, follow these steps in your terminal:
-
Download and run the NVM install script:
curl -o- https://raw.githubusercontent.com/creationix/nvm/v0.33.11/install.sh | bash -
Add NVM to your shell profile. Paste this into your terminal:
export NVM_DIR="$HOME/.nvm" [ -s "$NVM_DIR/nvm.sh" ] && \. "$NVM_DIR/nvm.sh" # This loads nvm -
Reload your terminal or run:
source ~/.bashrc -
Check if NVM installed correctly:
command -v nvmYou should see
nvmas the output.
📝 Tip: If you see errors or the install takes a long time, your raspberry pi may need more memory or swap space. Older models sometimes have trouble with big installs. Make sure your shell profile is set up right. If you still have problems, try to install nodejs with apt or use pre-built binaries.
Installing NodeJS
After you install NVM, you can install nodejs with just one command. This tutorial uses the latest stable version, which is also the current lts version. Type this in your terminal:
nvm install stable
You can also install the newest version of node.js by typing:
nvm install node
To check your nodejs version, use:
node -v
To check npm (which comes with nodejs), use:
npm -v
This method works for most users and is beginner-friendly. You do not need to worry about system permissions or breaking other software. NVM keeps everything in your home folder, so you can update or remove nodejs without risk.
💡 Note: If you want to install npm separately, you do not need to. NVM installs npm with nodejs automatically.
Set NodeJS Version
NVM lets you switch between different nodejs versions. This is helpful if you work on projects that need different versions. You can install more than one version and change between them easily.
Here is how you do it:
-
List all installed nodejs versions:
nvm ls -
Install a specific version (for example, version 14.17.0):
nvm install 14.17.0 -
Switch to a version you installed:
nvm use 14.17.0 -
Set a default version for all new terminals:
nvm alias default 14.17.0 -
If you want to see all available versions, type:
nvm ls-remote
You can also use a .nvmrc file in your project folder. Put the version number inside this file. When you run nvm use in that folder, NVM will switch to the right version for your project.
| Benefit/Feature | Explanation |
|---|---|
| Easy installation | You can install nodejs with simple commands on raspberry pi. |
| Multiple versions | You can install and use many nodejs versions at the same time. |
| Version switching | You can switch between versions with one command. |
| Project compatibility | You can work on projects that need different nodejs versions. |
| npm version management | npm matches the nodejs version, so your packages always work right. |
| Recommended method | Most tutorials suggest NVM for raspberry pi because it is flexible and safe. |
🚀 Pro Tip: If you share your raspberry pi with others, NVM helps keep each user's nodejs setup separate. This makes setting up node.js for different users simple and safe.
This tutorial shows you how to install nodejs, install npm, and manage versions on raspberry pi. You can now install nodejs for any project, switch versions, and keep your system clean. Most users find this method works best for installing nodejs and keeping it up to date.
Verify Node.js on Raspberry Pi
After you finish installing nodejs, you need to make sure everything works on your raspberry pi. This step helps you avoid problems later. You can use a few simple commands to check your setup. This tutorial will show you how to check both nodejs and npm.
Check NodeJS Version
You should always check the version of nodejs after installation. This step tells you if the process worked. On your raspberry pi, open the terminal and type:
node -v
You can also use:
node --version
If you see a version number, nodejs is ready to use. This tutorial recommends you try a quick test. Make a new folder on your raspberry pi and go into it. Create a file called index.js and add this line:
console.log('Welcome to NodeJs.');
Now run the script:
node index.js
If you see the message in your terminal, nodejs works on your raspberry pi. You can also try a simple web server. Make a file named app.js and add a basic HTTP server code. Start the server with node app.js and visit http://localhost:3000 in your browser. This test shows that nodejs runs well on your raspberry pi.
✅ Tip: Always check the version after every nodejs update. This habit helps you keep your raspberry pi projects running smoothly.
Check npm Version
npm comes with nodejs. You need npm to install packages for your projects. To check the npm version, type this command in your terminal:
npm -v
If you see a version number, npm is ready. This tutorial suggests you use npm to install a simple package as a test. For example, try:
npm install cowsay
If the install works, npm is set up on your raspberry pi. You can now use npm for any nodejs project or tutorial.
📝 Note: If you do not see a version number, check your nodejs installation or repeat the tutorial steps.
Alternative Ways to Install Node.js
There are different ways to put nodejs on your raspberry pi. Each way works better for some models or needs. This part helps you pick another way if NVM is not right for you.
NodeSource Method
NodeSource gives you the newest nodejs for your raspberry pi. Use this if you want new features or faster speed. Many people like NodeSource because it lets you update nodejs with apt. This way works well for Raspberry Pi 2, 3, 4, and 5. It does not work for Raspberry Pi Zero W.
To use NodeSource, you add a special repository and a GPG key. This lets you use apt to install nodejs and get updates. Here is a table to help you choose:
| Raspberry Pi Model | ARM Version | Installation Method Suitability |
|---|---|---|
| Raspberry Pi Zero W | ARMv6 | Official binary installation required; NodeSource/apt unsupported |
| Raspberry Pi 2 | ARMv7 | NodeSource repository recommended for easy updates |
| Raspberry Pi 3/4/5 | ARMv8 | NodeSource repository recommended for easy updates |
Tip: NodeSource does not work with ARMv6. If you have a Raspberry Pi Zero W, use the official binary method instead.
Using apt
You can use apt to put nodejs on your raspberry pi. This way is easy and uses the built-in package manager. Many beginners start with apt because it is simple. You only need to type a few commands. But apt often gives you older nodejs versions. These might not have new features or fixes.
Here is a table with the good and bad points:
| Aspect | Advantage | Disadvantage |
|---|---|---|
| Automatic Security Updates | Nodejs from apt gets security updates with system upgrades. | - |
| Setup Complexity | - | Adding NodeSource repository and GPG keys can be hard. |
| Version Management | - | You cannot use more than one nodejs version like with NVM. |
| npm Global Package Handling | - | You might need to change npm settings to fix permission problems. |
Use apt if you want a fast install and do not need the newest nodejs. Remember, apt and NodeSource do not work on Raspberry Pi Zero W.
Download Official Binaries
If you have a Raspberry Pi Zero W or another model with ARMv6, use the official binary method. Nodejs is not in apt or NodeSource for these models. This way means you download nodejs from the website and install it yourself.
Follow these steps:
-
Go to the Node.js website and find the armv6l binary.
-
Download the tarball, like node-v9.7.1-linux-armv6l.tar.gz.
-
Unzip the files.
-
Move them to the right folder on your raspberry pi.
-
Add nodejs to your PATH.
This way works for old raspberry pi models but has more steps. You do not get updates with apt, so you must update nodejs by yourself.
Note: Official binaries are faster and work better on new raspberry pi models. Old models like the first Zero are slower and have less support.
Node-RED Script for IoT Projects
If you want to use your raspberry pi for IoT, try the Node-RED script. This script puts Node-RED and nodejs on your device together. Run this command in your terminal:
bash <(curl -sL https://raw.githubusercontent.com/node-red/linux-installers/master/deb/update-nodejs-and-nodered)
This script gives you the newest versions, which is important for IoT. You can also make Node-RED start every time your raspberry pi turns on.
💡 Node-RED is good for IoT because it helps you control sensors, collect data, and automate tasks with nodejs.
Troubleshooting Installing NodeJS
Common Errors
You may see some errors when you try installing nodejs on your raspberry pi. Many users run into problems with package dependencies. For example, you might see a message like “The following packages have unmet dependencies.” This often happens if your raspberry pi uses an older OS version, such as Debian 8 (Jessie). Node.js may need newer libraries, like libstdc++6 >= 5.2, which are not available on these systems.
Here are some common errors you might face:
-
Unmet dependencies during installation, especially on older raspberry pi OS versions.
-
Errors when trying to install Node.js v12 or newer on outdated systems.
-
Compilation errors if your system does not have the right development libraries.
-
Problems with missing headers, such as
alsa/asoundlib.h, during the build process.
If you use an older raspberry pi, try installing Node.js v10. This version works better with old systems. You can also download the correct ARMv7 or ARMv8 binary from the official Node.js website. This method helps you avoid most dependency and compilation issues.
To fix many errors, follow these steps:
-
Update your raspberry pi system:
sudo apt-get update && sudo apt-get upgrade -
Download and install a precompiled Node.js binary:
wget http://node-arm.herokuapp.com/node_latest_armhf.deb sudo dpkg -i node_latest_armhf.deb -
Check your Node.js and npm versions:
node -v npm -v -
Install missing development libraries if you see header errors:
sudo apt-get install libasound2-dev -
For some OS versions, install extra Qt5 packages:
-
On Buster:
sudo apt-get install qt5-default qtcreator qtdeclarative5-dev -
On Bullseye:
sudo apt-get install qtbase5-dev qtchooser qt5-qmake qtbase5-dev-tools qtcreator qtdeclarative5-dev
-
This tutorial helps you solve most errors you may see on your raspberry pi.
Fixing Path Issues
Sometimes, you install Node.js, but your raspberry pi cannot find it. This usually happens because of path problems. The PATH environment variable tells your system where to look for programs. When you use sudo, the PATH can change. Sudo uses a special “secure_path” that may not include the folder where Node.js lives. If you run sudo node -v and get “command not found,” this is likely the cause.
You can check your PATH by running:
echo $PATH
sudo echo $PATH
If the path to Node.js is missing in the sudo environment, you have a path issue. You can fix this by using the full path to the Node.js binary, like:
sudo /opt/node-v0.10.28-linux-arm-pi/bin/node
Tip: Adding Node.js to your user’s
.profiledoes not help with sudo. The sudo environment does not load your user’s profile.
When you write scripts on your raspberry pi, Node.js uses the current working directory (cwd) to resolve paths. If your script cannot find a file, use absolute paths or the Node.js path module. This helps avoid “ENOENT” errors.
Here are some best practices:
-
Use
path.resolve()and__dirnameto build absolute paths. -
Log
process.cwd()to check your current directory. -
Use
path.isAbsolute()to test if a path is absolute. -
Use
path.sepandpath.delimiterfor platform-specific path handling.
These steps make sure your scripts work well on any raspberry pi. This tutorial recommends using the Node.js path module for all file operations.
You can put nodejs on your raspberry pi by doing these steps: First, update your raspberry pi with sudo apt update and sudo apt full-upgrade. Next, use the curl command from the official website to install NVM. Then, pick the Node.js version you want and install it with NVM. After that, move your project files onto your raspberry pi. Finally, go to your project folder and start your Node.js server.
If you have any trouble, look at the troubleshooting part of this guide.
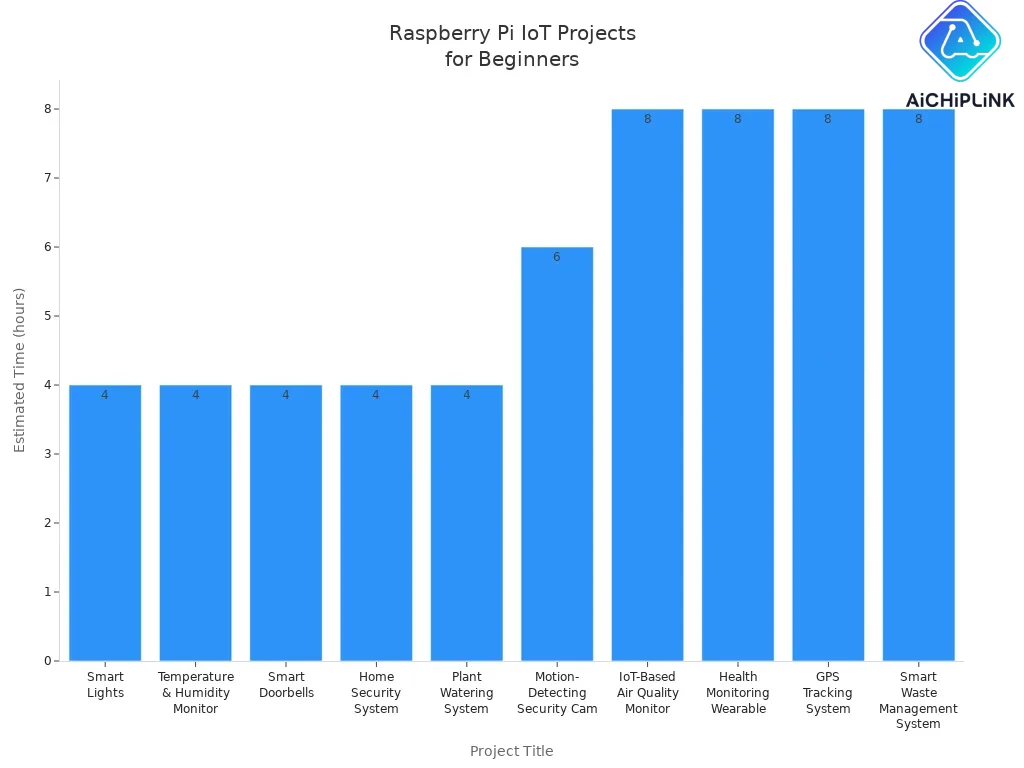
Try making a project to practice. Many beginners use their raspberry pi for things like smart lights, home security, or watering plants. Here are some ideas you can try:
| Project Title | Complexity | Estimated Time | Real-World Application Examples | Source Code Link |
|---|---|---|---|---|
| Smart Lights | Easy | 4 hours | Home automation, energy efficiency | GitHub |
| Temperature & Humidity Monitor | Easy | 4 hours | Environmental monitoring, indoor air quality | GitHub |
| Smart Doorbells | Easy | 4 hours | Remote doorbell notifications, home security | GitHub |
If you want to learn more, try Node-RED. This tool helps you set up tasks and connect devices on your raspberry pi. You can find more guides and tutorials to keep learning new things.
FAQ
Can I install Node.js on any raspberry pi model?
You can install Node.js on almost any raspberry pi model. Some older models may need special steps. Always check your raspberry pi’s CPU type before you start. This helps you pick the right method for your device.
Do I need to use NVM on my raspberry pi?
You do not have to use NVM, but it makes managing Node.js versions much easier. NVM works well on raspberry pi devices. You can switch between versions quickly. Many users find NVM the best choice for most projects.
What should I do if Node.js will not install on my raspberry pi?
First, update your raspberry pi with the latest software. Try the steps in this guide again. If you still have trouble, check your model’s compatibility. You can also try downloading official binaries or ask for help in raspberry pi forums.
How do I update Node.js on my raspberry pi?
You can update Node.js easily with NVM. Run nvm install node to get the latest version. Then use nvm use node to switch. This keeps your raspberry pi ready for new features and security updates.
Written by Jack Elliott from AIChipLink.
AIChipLink, one of the fastest-growing global independent electronic components distributors in the world, offers millions of products from thousands of manufacturers, and many of our in-stock parts is available to ship same day.
We mainly source and distribute integrated circuit (IC) products of brands such as Broadcom, Microchip, Texas Instruments, Infineon, NXP, Analog Devices, Qualcomm, Intel, etc., which are widely used in communication & network, telecom, industrial control, new energy and automotive electronics.
Empowered by AI, Linked to the Future. Get started on AIChipLink.com and submit your RFQ online today!