You may notice slow playback when you try to listen to audio on your Raspberry Pi. Slow audio playback often happens because of hardware limits or wrong settings. Sometimes, lag and laggy playback show up if your buffer size is too large or the sample rate does not match. You may even see playback issues in software like Premiere Pro. Audio lag can frustrate you, but you can fix slow playback with the right steps. Most slow audio problems happen often and have simple solutions.
Key Takeaways
- Slow audio playback on Raspberry Pi can happen because of hardware limits. These limits include old processors, not enough RAM, or slow SD cards. If you match your audio settings to your hardware, you can stop lag and distortion. Settings like buffer size and sample rate are important. Keep your Raspberry Pi’s software and audio drivers updated. Updates fix bugs and make playback better. You can use external audio devices like sound cards or audio HATs. These can help lower lag and make sound better. Always check your cables and connections. Also, look at your project settings in audio software. This helps you avoid problems with sync and playback.
Hardware Factors
Processing Power
Your Raspberry Pi’s processor plays a big role in how well it handles audio playback. If you use an older model, you may notice slow playback or lag, especially when you run other programs at the same time. The CPU must process audio data quickly. If it cannot keep up, you hear stuttering or slow sounds.
Here is a quick look at how different Raspberry Pi models compare for audio playback:
| Raspberry Pi Model | Audio Output Options | Notes on Audio Playback Performance Impact |
|---|---|---|
| Pi 1 to Pi 4 | 3.5mm audio jack (analogue), HDMI, Bluetooth | Standard analogue audio jack available, widely compatible |
| Pi 5 | HDMI, Bluetooth only (no 3.5mm audio jack) | Removal of audio jack limits direct analogue output; requires HDMI, Bluetooth, USB audio devices, or audio HATs for playback |
If you use a Pi 5, you do not get a 3.5mm audio jack. You need to use HDMI, Bluetooth, or a USB audio device. This change can affect how you set up your sound system and may lead to slow playback if you use an unsupported device.
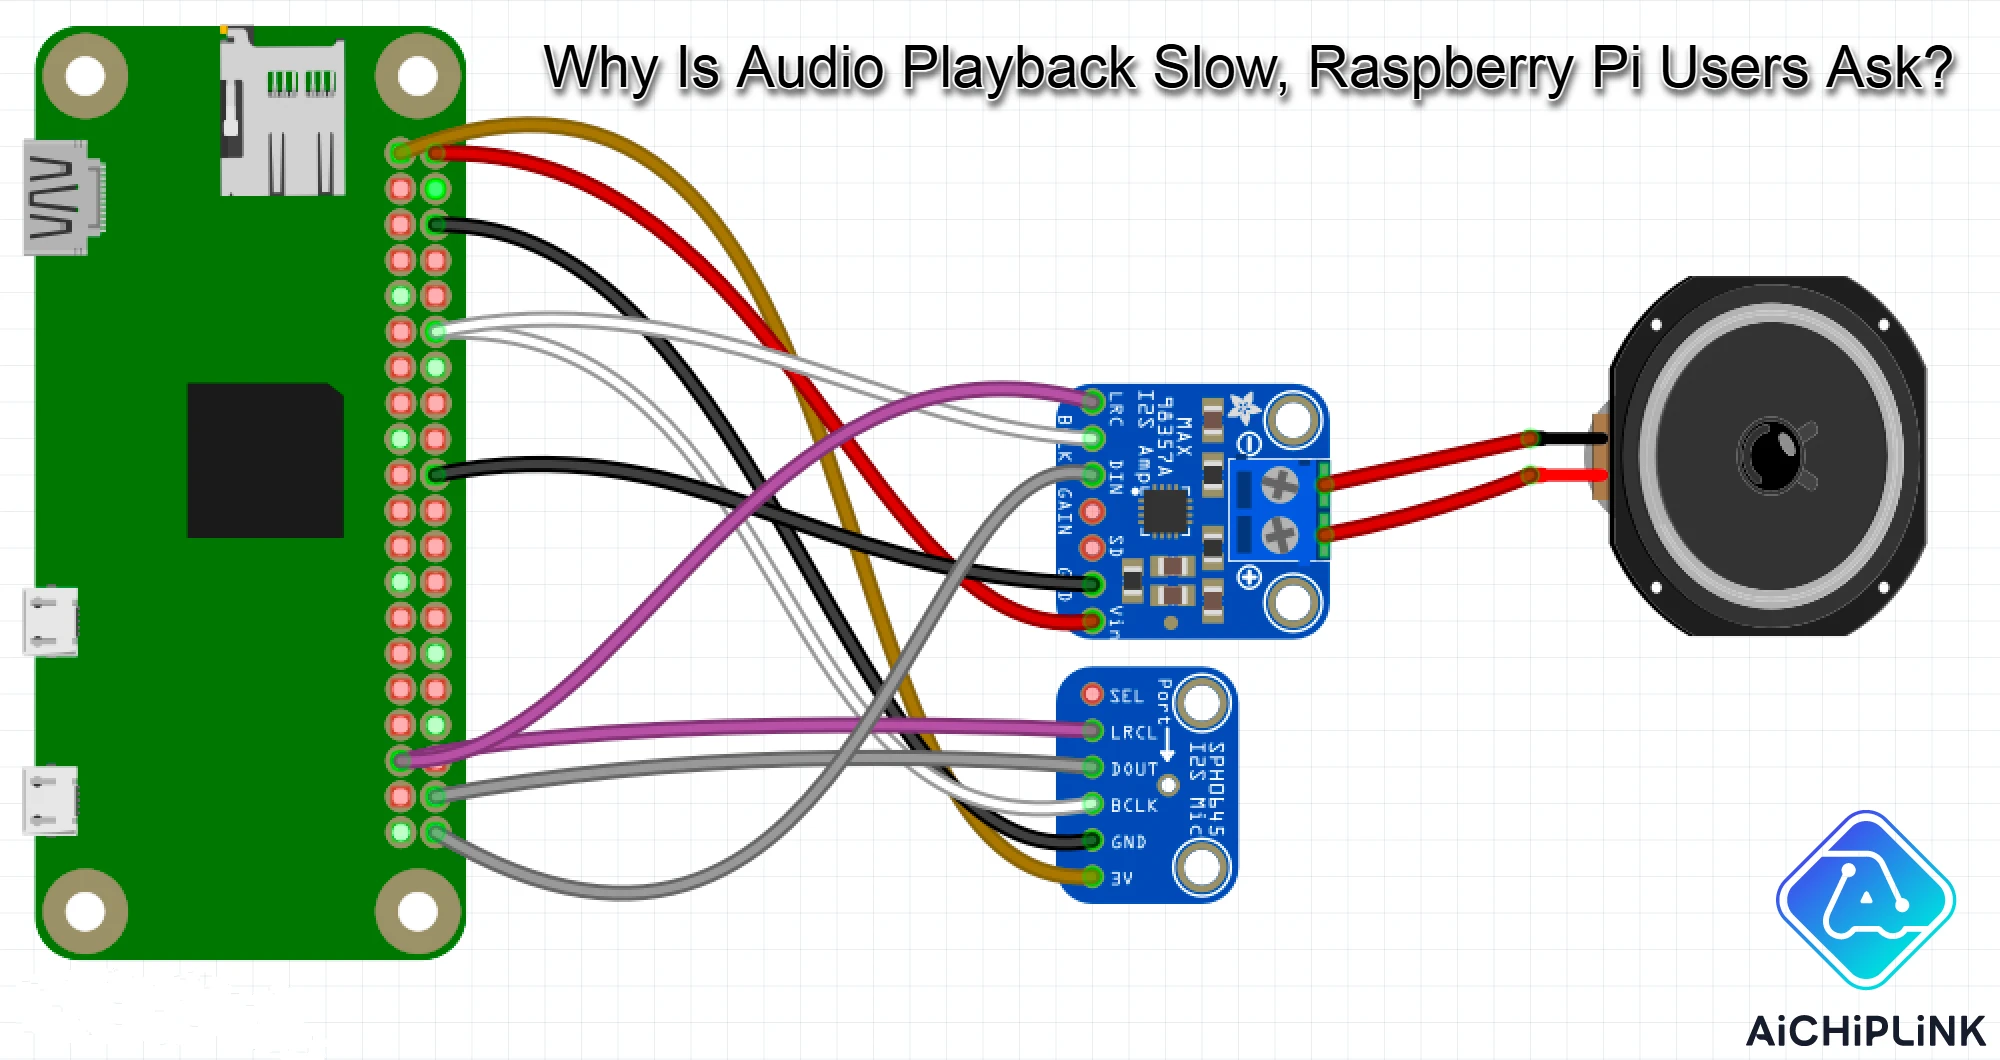
Tip: For better audio playback, try using an audio HAT. Audio HATs like the Codec Zero give you more options and higher quality sound. They use advanced codecs and mixers, which help reduce lag and improve playback even on newer models without an analogue jack.
RAM and SD Card
You also need enough RAM and a fast SD card for smooth audio playback. If your Raspberry Pi runs out of memory, it cannot buffer audio data well. This causes slow playback or lag. A slow SD card can also make things worse. The system reads audio files from the SD card. If the card is slow, you may hear skips or delays.
To avoid slow playback, choose a Raspberry Pi with more RAM and use a high-speed SD card. This helps your device load and play audio files faster. You get fewer interruptions and a better listening experience.
Audio Playback Settings
Buffer Size
Buffer size controls how much audio data your Raspberry Pi processes at one time. If you set the buffer size too high, you may notice a delay before you hear sound. If you set it too low, you might hear pops or glitches during playback. For most users, a buffer size of 1024 or 2048 frames per period works best when using HDMI or the onboard audio output. These settings help keep playback stable and reduce the load on your CPU.
-
HDMI and onboard audio work best with buffer sizes of 1024 or 2048 frames.
-
Lower buffer sizes, like 128 or 256 samples, often do not work well with built-in hardware.
-
If you want low-latency playback, try an external soundcard. Some soundcards support buffer sizes as low as 64 frames, but you need to optimize your system for this.
Tip: If you use a MIDI keyboard or softsynth, an external soundcard can help you achieve smoother playback with less delay.
Sample Rate
Sample rate measures how many times per second your Raspberry Pi captures or plays back audio. Common rates include 44.1kHz and 48kHz. If you change the sample rate without proper resampling, playback speed can change. Higher sample rates, like 192kHz or even 384kHz, can reduce latency and sometimes improve quality, but only if your hardware supports them.
-
Higher sample rates may help stabilize playback and lower latency.
-
Not all DACs benefit from higher rates, so check your device’s specs.
-
Using the wrong sample rate can make playback sound too fast or too slow.
Note: Always match your audio file’s sample rate to your playback device for the best results.
Bit Rate
Bit rate tells you how much data your audio uses each second. Higher bit rates usually mean better sound quality, but they also need more processing power and storage. If you use a low bit rate, playback may sound muffled or distorted. For most music and podcasts, a bit rate of 128 kbps or higher works well. If you want high-quality playback, choose 256 kbps or more.
-
High bit rates give you clearer playback but use more resources.
-
Low bit rates can cause playback to lose detail or sound choppy.
Remember: Find a balance between quality and performance for the best audio playback on your Raspberry Pi.
Software and Drivers
Outdated Drivers
Slow playback can happen if your drivers are old. Drivers help your Raspberry Pi talk to the audio hardware. Old drivers may not work well with audio files. You might hear pops, clicks, or long delays. Always look for the newest drivers for your Raspberry Pi. New drivers fix bugs and help your device play audio better. If you use a USB sound card or external DAC, install the right drivers for those too.
Audio Player Choice
The audio player you pick can change how well audio plays. Some players use more memory and CPU than others. VLC and Audacious are light players that work well on Raspberry Pi. These players use less power, so playback is smoother. Some advanced players have more features but can slow things down. If you hear lag or stutter, try a simpler player. You can also check the player’s settings for ways to make playback better, like hardware acceleration or buffer changes.
System Updates
Updating your system helps you get better audio playback. Updates fix bugs and help your Raspberry Pi handle audio better. Here are some ways updates help:
-
Firmware updates can stop clicks or pops in your audio. These sounds often come from voltage changes in the Broadcom VideoCore firmware.
-
You can change settings, like adding
audio_pwm_mode=2in/boot/config.txtor turning off audio sleep in PulseAudio. These changes can make playback smoother. -
Even with updates, the analog output on Raspberry Pi has limits because it uses a PWM-based codec. For better playback, use an external USB or GPIO sound card.
Tip: Check for updates often. New software and firmware can really help your playback quality.
Synchronization Issues
When you play audio on your Raspberry Pi, you might notice that the sound does not match what you expect. This often happens because of synchronization issues. These problems can make your audio slow, choppy, or out of sync with video or other sounds.
Sample Rate Mismatch
If your audio file uses a different sample rate than your playback device, you may hear slow or fast playback. For example, if your file is at 44.1kHz but your device expects 48kHz, the sound can become distorted or play at the wrong speed. On Raspberry Pi OS, updates to the audio sample offset sometimes happen in large, uneven steps. For instance, the system might update every 30 milliseconds by 1114 samples at 48kHz. This is not frequent enough to keep the sound card in sync. Other Linux systems update more often, which helps keep audio smooth. Because of this, you may hear lag or slow playback on your Raspberry Pi.
Tip: Always check your audio file’s sample rate and match it to your device settings for the best results.
Project Settings
Incorrect project settings in your audio software can also cause playback speed problems. Here is how this can happen:
-
You play a 16000Hz audio file, but it sounds too fast and high-pitched.
-
The default audio device or ALSA settings are not set up right.
-
You edit
/etc/modprobe.d/alsa-base.confto make your USB audio device the default. -
You use
aplay -Lto list devices and confirm the USB device is now default. -
You test playback with
aplay -Dsysdefault:CARD=USB. -
You update your
.asoundrcfile to use the correct hardware device. -
After these changes, your playback speed and pitch return to normal.
Import Problems
Sometimes, slow audio playback happens when you import audio files into your project. The most common problem comes from the Java Sound API. The method Clip#getFramePosition() runs very slowly on Raspberry Pi. This happens even if you change your JDK version, Raspberry Pi model, or audio format. CPU and memory use stay low, so the problem is not with your hardware. You can try using different buffer sizes or switch to another audio library like AudioCue-maven. Counting frames manually with SourceDataLine can also help. These steps can fix slow playback caused by import problems.
Troubleshooting Steps
When you notice laggy playback or slow audio on your Raspberry Pi, you can follow these steps to fix laggy playback and enjoy smooth sound. Each step helps you find the cause and fix laggy playback, whether you use simple audio files or work in software like Premiere Pro or Cubase.
Check Hardware
Start by checking your hardware. Make sure your Raspberry Pi has enough RAM and a fast SD card. If you use an external DAC or sound card, check that it connects properly. Loose cables or unsupported devices can cause laggy playback or slow audio. Try a different USB port if you use a USB sound card. If you use HDMI for playback, test another cable or monitor.
Tip: Use a Raspberry Pi model with more RAM for better audio playback. A high-speed SD card also helps reduce lag.
Adjust Audio Settings
Many slow playback problems come from wrong audio settings. You can fix laggy playback by making sure your settings match your hardware. Here are some adjustments that work best:
-
Set the sample frequency and bit depth to match your DAC. For example, use 48kHz and 16 or 24-bit if your DAC supports these.
-
Check that the bit clock (BCLK) matches the sample frequency and bit depth.
-
Avoid using sample rates like 44100Hz if your DAC does not support them.
These changes help stop laggy playback and fix laggy playback caused by mismatched clock signals or sample rates. You can also adjust the buffer size. A buffer size of 1024 or 2048 frames works well for most Raspberry Pi setups. If you use an external sound card, you can try lower buffer sizes for less delay.
Note: Always match your audio file’s sample rate to your playback device. This step prevents slow or distorted playback.
Update Software
Old software can cause slow playback or lag. Update your Raspberry Pi OS and all audio drivers. Updates often fix bugs that cause laggy playback. If you use a USB DAC or sound card, install the latest drivers for your device. You can also update your audio player. Lightweight players like VLC or Audacious often give better playback on Raspberry Pi.
To update your system, open a terminal and run:
sudo apt update
sudo apt upgrade
Check for firmware updates too. These updates can fix lag or slow playback, especially when you use the analog output.
Test in Premiere Pro
If you use Premiere Pro or Cubase on your Raspberry Pi or remote desktop, you might see after effects playback issues or laggy playback. These programs need the right settings for smooth playback. Here is how you can fix laggy playback in Premiere Pro:
-
Set the audio hardware settings in Premiere Pro to match your Raspberry Pi’s output. Use the same sample rate and bit depth as your DAC.
-
Go to Preferences > Audio Hardware in Premiere Pro. Choose the correct output device.
-
Lower the buffer size if you notice after effects playback lag. A smaller buffer can help, but do not set it too low.
-
Check your project settings. Make sure the sample rate matches your audio files.
-
If you still see slow playback, try exporting a short section and playing it outside Premiere Pro. This test helps you see if the problem comes from the software or the hardware.
Callout: In Cubase, you can fix laggy playback by opening the Audio Connections panel. Set the sample rate and buffer size to match your hardware. Always save your project before making changes.
If you use after effects playback in Premiere Pro, check the preview settings. Lower the preview quality if you see lag. This step helps your Raspberry Pi keep up with the demands of playback.
By following these steps, you can fix laggy playback and enjoy smooth audio playback on your Raspberry Pi. You can use these tips for both simple audio files and complex projects in Premiere Pro or Cubase.
Prevention Tips
Keep Software Updated
You can stop slow audio playback by updating your Raspberry Pi. Updates fix bugs and help your device play sound better. Here are some steps to keep your system up to date: 1. Run sudo apt-get -y update && sudo apt-get -y upgrade to update your Raspberry Pi. 2. Add audio packages like mopidy and upmpdcli for better sound. 3. Set up network shares and permissions so your Pi can read audio files easily. 4. Restart your Raspberry Pi after updates to make changes work. 5. Test sound with aplay /usr/share/sounds/alsa/Front_Center.wav to see if audio works well.
Tip: Updating often helps you avoid many audio problems.
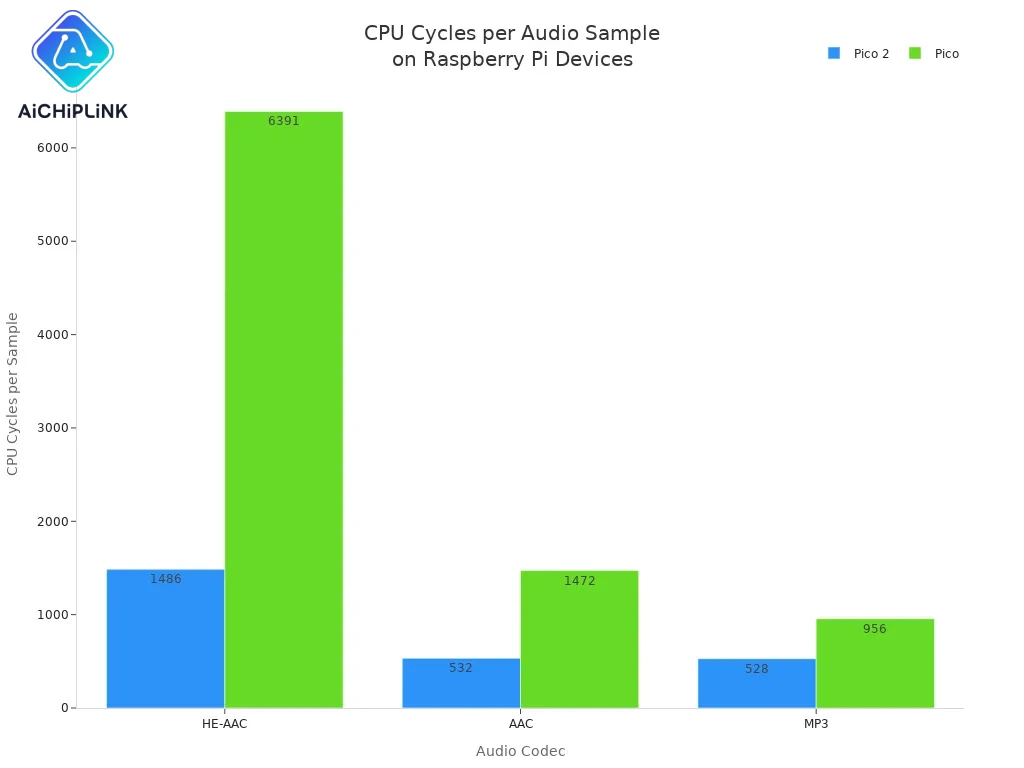
Optimize Resources
You can get better sound by helping your Raspberry Pi use its power well. Using the right libraries and keeping your device cool helps audio play without stopping. The table below shows how different settings change performance:
| Device | Codec | CPU Cycles per Sample | Notes |
|---|---|---|---|
| Pico 2 | HE-AAC | ~1486 | Handles HE-AAC efficiently |
| Pico 2 | AAC | ~532 | Less intensive than HE-AAC |
| Pico 2 | MP3 | ~528 | Comparable to AAC |
| Pico | HE-AAC | ~6391 | Higher CPU usage, more intensive |
| Pico | AAC | ~1472 | Moderate CPU usage |
| Pico | MP3 | ~956 | Moderate CPU usage |
Try these tips too: - Use an external SSD or HDD for your music. - Keep your drives cool and let air move around them. - Watch your device’s temperature to stop it from getting too hot, which can slow down sound.
Use Compatible Settings
Picking the right settings helps you stop slow audio playback. Check your setup files and use settings that fit your hardware and software. The table below lists some important things to do:
| Setting / Action | Description | Condition / Notes |
|---|---|---|
| Remove duplicate dtoverlay lines in /boot/config.txt | Prevents slow playback caused by repeated overlay entries | Check config.txt for repeated lines and remove extras |
| Use specific dtoverlay options based on kernel version | For kernel < 6.1.77 use dtoverlay=hifiberry-dacplus,slave; for kernel > 6.1.77 use dtoverlay=hifiberry-dacplus-std | Kernel version check via System Information Plugin |
| Add force_eeprom_read=0 to config.txt | Disables onboard EEPROM usage to ensure correct DAC operation | Recommended by HiFiBerry for Pi5 compatibility |
| Update Raspberry Pi firmware | Ensures latest fixes and compatibility improvements | Follow Raspberry Pi OS documentation for firmware updates |
| Select alternative DAC option "BassFly with I2S Mic" in DAC selection list | Alternative DAC selection to avoid slow playback issues | Suggested workaround in Volumio DAC setup |
| Revert kernel to version 6.1.69 or update to test image v3.731 | Fixes regression causing slow playback in kernel 6.1.77 and later | Enables stable playback on Raspberry Pi 5 with HiFiBerry DACs |
Note: Always use audio settings that match your hardware for the best sound.
You may face slow audio playback on your Raspberry Pi because of hardware limits, wrong settings, or sync problems. Most issues have easy fixes. Stay proactive to keep your audio smooth:
-
Adjust audio levels with Alsamixer for clear sound.
-
Turn off extra services and manage swapfile use.
-
Watch CPU and memory to spot slowdowns.
-
Update your OS and audio software often.
-
Check hardware and use logs to catch problems early.
Regular care helps you enjoy reliable audio every time.
FAQ
Why does my Raspberry Pi audio sound slow or distorted?
You may hear slow or distorted audio if your sample rate or buffer size does not match your hardware. Check your audio settings. Use the correct sample rate for your device. Update your drivers for better sound.
How can I fix laggy audio playback on my Raspberry Pi?
You can fix laggy audio by updating your software, using a faster SD card, and matching your buffer size to your hardware. Try lightweight audio players like VLC. Test your cables and connections.
Tip: Restart your Raspberry Pi after making changes.
What is the best buffer size for smooth audio playback?
Most Raspberry Pi setups work best with a buffer size of 1024 or 2048 frames. If you use an external sound card, you can try lower buffer sizes. Always test different settings to find what works best for you.
Can I use Bluetooth speakers with my Raspberry Pi?
Yes, you can use Bluetooth speakers. Pair your speaker in the Raspberry Pi settings. Set it as the default audio output. Some Bluetooth devices may have extra delay. Wired connections usually give you better sound quality.
Why does audio playback slow down in programs like Premiere Pro?
Premiere Pro may slow down audio if your project settings do not match your hardware. Check your sample rate and buffer size. Set the correct output device in the software. Export a short clip to test playback outside Premiere Pro.
Written by Jack Elliott from AIChipLink.
AIChipLink, one of the fastest-growing global independent electronic components distributors in the world, offers millions of products from thousands of manufacturers, and many of our in-stock parts is available to ship same day.
We mainly source and distribute integrated circuit (IC) products of brands such as Broadcom, Microchip, Texas Instruments, Infineon, NXP, Analog Devices, Qualcomm, Intel, etc., which are widely used in communication & network, telecom, industrial control, new energy and automotive electronics.
Empowered by AI, Linked to the Future. Get started on AIChipLink.com and submit your RFQ online today!