Soil Moisture Sensor Arduino Tutorial for Beginners

Healthy houseplants and smart watering systems share one secret: you must know how much water sits in the soil. A soil moisture sensor gives you that answer in real time.
This tutorial shows you how to interface a soil moisture sensor with an Arduino. You will wire the module, upload a sketch, and read moisture levels step by step. Interfacing sounds technical, yet the process is simple. You connect three wires, then watch numbers appear on your screen.
You need no prior experience to start. The whole build takes only a short session. Beginners often finish the basic setup in one sitting. Grab your board and sensor, and let's read some soil.
Key Takeaways
-
Choose a capacitive soil moisture sensor for a longer life and better accuracy.
-
Connect three wires: VCC to 5V, GND to GND, and the signal wire to an analog pin such as A0.
-
Send a simple sketch to the board to read raw values from the sensor.
-
Calibrate your sensor by recording dry and wet readings so you get accurate percentages.
-
Add displays or automatic watering to your project for smarter plant care.
Gather Your Soil Moisture Sensor Module
A clean table and a few minutes of prep make the wiring step smooth. Gather every part first, then you can build without interruptions. A missing jumper wire can stall a simple project, so check your stock now.
Essential Parts List
You need five core items for this build. An Arduino board acts as the brain, and the Uno or Nano both work well for this project. A soil moisture sensor module holds the probe and a small circuit board. Jumper wires link the module to your board. A USB cable connects the Arduino to your computer for power and code upload. Capacitive sensors also need a sensor cable, which usually comes in the box.
Lay the parts out and check each one. Confirm the soil moisture sensor module has three pins you can reach with jumper wires. Look at the probe tip for damage before you push it into soil. A quick inspection now saves debugging time later. Replace any bent or loose wire before you start.
Choosing Your Sensor Type
The FC-28 is a common, low-cost resistive module, and many starter kits include one. It works well for short experiments, classroom demos, and budget builds. A capacitive soil moisture sensor costs a bit more, and it suits beginners who plan to leave the probe in soil for weeks. Both soil moisture sensors measure water content, so either one gets you started.
Think about your goal before you buy. A quick demo fits the FC-28 nicely. A long-running plant monitor fits the capacitive moisture sensor better. Many soil moisture sensors ship as a module plus probe package, so read the listing carefully. Soil moisture sensors vary in build quality, and a look at reviews helps. A beginner often keeps the first sensor for years, so choose with care. Match the sensor to your project, and you will enjoy the build more.
How the Soil Moisture Sensor Works
A soil moisture sensor checks how much water is in the soil. It turns that measurement into an analog signal. Your Arduino reads this signal through an analog pin. The signal changes as the soil dries out or gets wetter. You see the result as a number in the Serial Monitor.
The sensor does not report liters or grams. It reports a voltage level, and the Arduino turns that level into a number between 0 and 1023. This range comes from the Arduino's 10-bit analog-to-digital converter. A wet reading and a dry reading sit at opposite ends of that range.
Resistive vs. Capacitive Sensors
Resistive soil moisture sensors measure how much the soil resists electricity. Water carries electricity, and dry soil does not. The sensor sends a current through two metal electrodes. Wet soil lets the current flow easily, and dry soil blocks it. DFRobot explains that more moisture means lower resistance.
Capacitive soil moisture sensors work in a different way. The soil acts as the dielectric between two metal plates. Wet soil stores more charge than dry soil. The sensor detects this change and estimates how much water is in the soil. DFRobot notes that these sensors support analog output, and some models add I2C or UART interfaces.
| Sensor Type | Accuracy | Durability | Lifespan | Price |
|---|---|---|---|---|
| Capacitive | Moderate (±3%–5%) | High | 1 to 3 years | Low |
| Resistive | Low (±5%–10%) | Low (electrodes corrode) | A few months to a year | Lowest |
Resistive soil moisture sensors work well for short-term or low-cost projects. Their exposed probes corrode over time, per DFRobot. Capacitive models cost a little more, but they last longer and need less upkeep.
Why Choose a Capacitive Soil Moisture Sensor
A capacitive soil moisture sensor gives beginners clear benefits. The Soldered documentation lists three: no exposed metal contacts, more reliable readings over time, and better performance in chemically active soils. You can leave the probe in a pot for weeks without worry.
DFRobot also suggests capacitive sensors for home gardening and small-scale plant growing. They resist corrosion, handle salty soil, and connect easily with an Arduino. A capacitive moisture sensor costs a little more at first. That extra cost pays back through fewer replacements.
Knowing these basics is your first step before wiring. You now know what the sensor measures and why the signal matters. Next, you connect the pins and bring the readings to life.
Wiring the Moisture Sensor to Arduino

You have the parts and you understand the signal. Now you build the physical link between the probe and the board. This step is short, and it rewards careful work. Three wires carry power, ground, and data. Get them right once, and the rest of the project flows smoothly.
Step-by-Step Connections
Work on a dry surface and keep the board unplugged from USB while you wire. Follow these steps in order:
-
Connect the GND pin on the soil moisture sensor module to a GND pin on the Arduino. Vilros lists this as the first connection, and it gives your circuit a shared reference point.
-
Connect the VCC pin on the module to the 5V pin on the Arduino. This pin supplies power to the sensor circuit.
-
Connect the SIG (signal) output pin to an analog pin on the board. Vilros uses A3 in its example, and A0 works just as well. Pick one and remember it for your code.
The FC-28 module adds a second output. Its A0 pin carries the analog signal, and its D0 pin carries a digital high or low signal. You only need the analog output for this tutorial. Leave D0 unconnected for now.
SparkFun notes that these soil moisture sensors accept between 3.3V and 5V, and the analog value shifts with the supply voltage. Power the module from 5V and keep that choice consistent. A steady supply makes your readings repeatable.
Connection Table
The table below shows the standard wiring for an analog read. It matches the FC-28 layout and the LastMinuteEngineers reference, with the signal line moved to A0.
| Soil Moisture Sensor Pin | Arduino Pin |
|---|---|
| VCC | 5V |
| GND | GND |
| A0 (analog output) | A0 |
| D0 (digital output) | Not connected |
Treat this table as your diagram in text form. Trace each row with your finger before you power up. A swapped VCC and GND connection can damage the module, so double-check both power lines.
The same wiring works on an Arduino Nano. The Nano exposes 5V, GND, and analog inputs in the same logical order, so you move the three jumper wires to the matching Nano pins. This makes a compact monitoring system possible. A Nano plus a capacitive soil moisture sensor fits inside a small enclosure near your plants.
One more tip from SparkFun: you can power the sensor from a digital pin set to HIGH instead of the 5V rail. This lets you switch the sensor off between readings and extend its life. If the sensor needs more current than a digital pin can supply, add a transistor. For your first build, the 5V rail is the simplest choice.
Writing Code to Interface the Sensor
You have the wiring done. Now you give the board instructions. The soil moisture sensor code comes in two stages. First you verify raw readings. Then you convert the measured value to a percentage. You interface the board and the probe with just a few lines, and you can type both sketches by hand in minutes.
Test with Raw Values
Start with a short sketch. It reads one pin and prints the result. The analogRead function measures the voltage on one analog pin and returns an integer. It takes one parameter, the pin to read. On a 10-bit board like the Uno or Nano, the result runs from 0 to 1023, per Controllerstech. Boards with a 12-bit converter reach 4095 only after you raise the resolution in setup.
const int sensorPin = A0;   // signal wire on A0

void setup() {
  Serial.begin(9600);       // open the serial port
}

void loop() {
  int sensorValue = analogRead(sensorPin);  // 0 to 1023
  Serial.print("Raw: ");
  Serial.println(sensorValue);
  delay(1000);
}
This first sketch is the simplest way to interface the moisture sensor. You read the analog value and print it. No math, no mapping, just a number you can trust. The Serial.print function sends text to the serial monitor on your computer. Serial.println adds a line break after each value. The delay keeps the output readable. Sunfounder's plant monitor lesson uses this same pattern with a one-second pause.
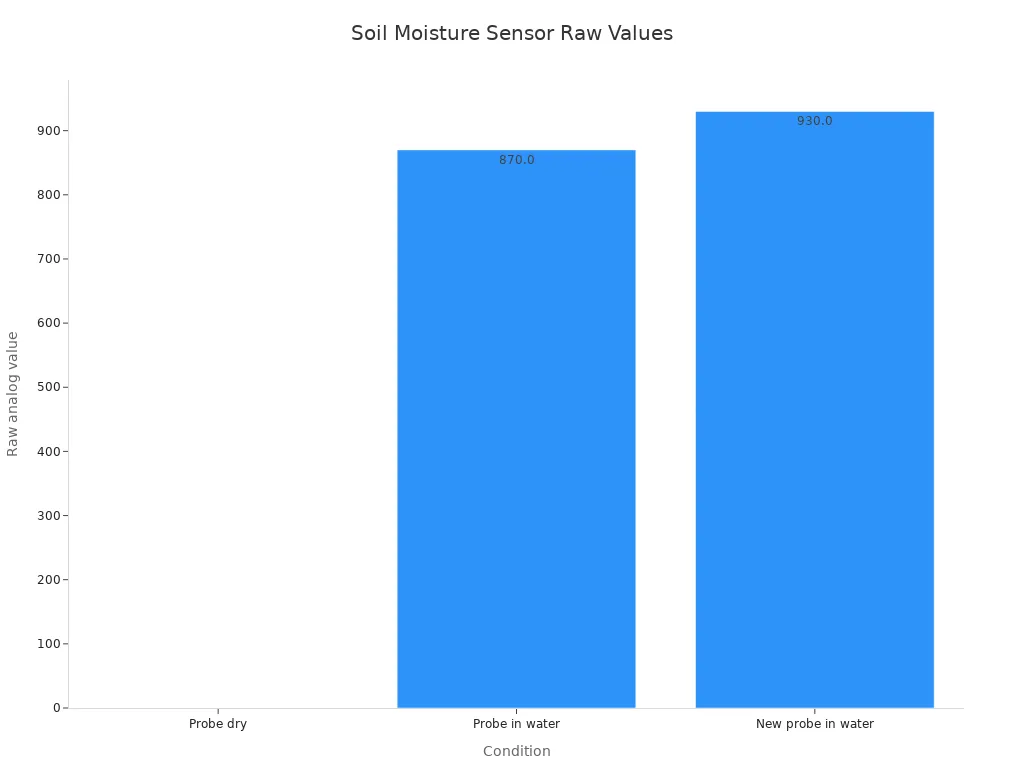
Open the serial monitor and watch the numbers. A probe in dry air sits near the bottom of the range. NCD community users report a dry probe reading around 0 and a probe fully in water reading around 870. A new probe from the same maker read around 930 in water. Expect some drift between probes, even from one maker. The chart below, from NCD, compares these conditions.
Convert to Percentage
Raw numbers work, yet percentages are easier to read. The map function rescales one number range into another. You give it the input, the low and high of the input range, and the low and high of the output range. Osoyoo mapped a dry reading of 550 and a wet reading of 10 onto 0 to 100. Your sensor may run in the opposite direction, so check which end is wet.
int raw = analogRead(A0);
int percent = map(raw, 550, 10, 0, 100);
percent = constrain(percent, 0, 100);
Serial.print("Moisture: ");
Serial.print(percent);
Serial.println("%");
The constrain function stops the result from running past 0 or 100. Your own dry and wet numbers will differ, so swap in your values. Different soil moisture sensors report different ranges, and the analog moisture value shifts with supply voltage. Most soil moisture sensors follow this pattern, and the direction depends on the probe design. This completes the basic interfacing work. You can now read the data as a raw count or a percentage.
Uploading, Testing, and Calibration
Upload the Code
You have your sketch ready. Now you send it to the board. Follow these steps from Chipwired to upload your code:
-
Connect the Arduino with a USB cable. The cable powers the board, so you need no separate power supply.
-
Open the Arduino IDE on your computer.
-
Select your Board and Port under the Tools menu. Pick the model that matches your hardware.
-
Write or open your sketch. Code splits into a setup part and a loop part.
-
Click Sketch, then Upload. The RX and TX LEDs flicker as the code travels to the board.
After the upload finishes, open the serial monitor and set the baud rate to match your sketch. Chris Ruppel notes that the serial plotter shows a real-time view of your soil moisture sensor output. Watch the numbers change as you move the probe between dry and wet soil. This quick check confirms your wiring works.
Calibrate for Accuracy
Raw numbers mean little without a reference point. Calibration gives your readings meaning. DFRobot suggests a simple method. Record the sensor value in dry air as Value 1, which marks the dry boundary. Insert the probe into a cup of water and record Value 2, which marks the wet boundary. Keep the water below the red line on the board, since the components are not waterproof.
DFRobot also notes an inverse ratio between output and moisture for some probes. A dry reading of 520 and a wet reading of 260 is one example. Plug your own two values into the map function. Now every reading the moisture sensor reports carries real meaning.
A few habits improve accuracy. Insert the probe near the root zone, usually halfway down the pot, per Chelsea Garden Center. Take several readings in different spots. Check moisture before watering, not right after. Wipe the probe after each use. These steps keep your sensor values stable. Automatic plant watering is a natural next project once your readings prove reliable.
You have come a long way. You wired the soil moisture sensor, uploaded your sketch, and read moisture levels as raw values and percentages. You also calibrated the probe for accurate results.
Now you can take the next step. Add an LCD display to show readings at a glance. Build a water pump for automatic watering. Try cloud monitoring to track soil moisture sensors from anywhere. The same skills let you interface many soil moisture sensors into one system.
Keep experimenting. Your moisture sensor is a starting point, not an end. Build your own projects and watch your garden thrive.

Written by Jack Elliott from AIChipLink.
AIChipLink, one of the fastest-growing global independent electronic components distributors in the world, offers millions of products from thousands of manufacturers, and many of our in-stock parts is available to ship same day.
We mainly source and distribute integrated circuit (IC) products of brands such as Broadcom, Microchip, Texas Instruments, Infineon, NXP, Analog Devices, Qualcomm, Intel, etc., which are widely used in communication & network, telecom, industrial control, new energy and automotive electronics.
Empowered by AI, Linked to the Future. Get started on AIChipLink and submit your RFQ online today!
Frequently Asked Questions
Which Arduino pin should I use for the signal wire?
Any analog input works, and A0 is the common choice. Connect the signal pin to A0, then use the same pin name in your sketch. The wiring stays identical on an Uno or a Nano.
Why do my readings jump around?
Small jumps are normal. The analog value shifts with supply voltage, so power the module from a steady 5V rail. Take several readings in different spots and wipe the probe between uses. A loose jumper wire also causes noise.
What do the raw numbers mean?
The Arduino converts the sensor voltage into a number from 0 to 1023. A dry probe sits near the low end. A probe in water reads much higher, often around 870 to 930 depending on the unit.
How often should I check the readings?
Open the serial monitor whenever you want a snapshot. For a plant, check once a day before watering. The serial monitor shows each value as it arrives, so you can watch the trend over time.
Can I leave the probe in the soil?
Yes, with a capacitive soil moisture sensor. Its coated probe resists corrosion, so it lasts longer in a pot. Resistive probes corrode over time, so pull those out after short experiments. Either way, keep the circuit board dry.