
Table of Contents
- 1.0 What is the Arduino Mega 2560? The Powerhouse of the Arduino Family
- 2.0 Arduino Mega 2560 vs. Uno: Why and When to Upgrade
- 3.0 A Deep Dive into the Arduino Mega 2560 Pinout and Specs
- 4.0 Getting Started: Powering and Programming Your Mega 2560
You’ve embarked on an exciting new electronics project. You started with your trusty Arduino Uno, but as you add more sensors, LEDs, motors, and displays, you hit a wall: you've run out of pins. Your code is also getting larger and more complex, pushing the limits of the Uno's memory. So, what's the next step? For countless makers, students, and engineers, the answer is the Arduino Mega 2560.
If the Arduino Uno is the versatile sedan of the microcontroller world, the Mega 2560 is the heavy-duty pickup truck. It's built on the same easy-to-use Arduino platform but is supersized to handle the most demanding projects. This guide will cover everything you need to know about the Arduino Mega, compare it directly to the Uno, and help you decide if this powerhouse board is the right choice for your next big idea.
1.0 What is the Arduino Mega 2560? The Powerhouse of the Arduino Family
The Arduino Mega 2560 is a microcontroller development board based on the ATmega2560. It is the big brother to the Arduino Uno, designed specifically for projects that require a massive number of input/output pins, more memory, or more communication ports.
1.1 More Pins, More Memory, More Power
The Mega's defining feature is its sheer scale compared to the Uno:
- Massive I/O: It boasts a staggering 54 digital input/output pins and 16 analog inputs.
- Expanded Memory: It has 8 times the flash memory (256 KB) for storing larger programs and 4 times the SRAM (8 KB) for variables.
- More Peripherals: It includes four hardware serial ports (UARTs), which is a huge advantage for projects that need to communicate with multiple serial devices simultaneously.
1.2 The Brains: The ATmega2560 Microcontroller
At the heart of the Mega is the ATmega2560 microcontroller from Microchip (formerly Atmel). This powerful 8-bit MCU is what gives the Mega its expanded capabilities. While it runs at the same 16 MHz clock speed as the Uno's ATmega328P, its larger memory and peripheral set are what make it a true upgrade.
2.0 Arduino Mega 2560 vs. Uno: Why and When to Upgrade
The most common question users have is how the Mega stacks up against the Uno. While they share the same core Arduino DNA, their differences are significant.
2.1 Head-to-Head Specification Showdown
This table breaks down the key differences between the two most popular Arduino boards.
| Feature | Arduino Uno R3 | Arduino Mega 2560 |
|---|---|---|
| Microcontroller | ATmega328P | ATmega2560 |
| Digital I/O Pins | 14 | 54 |
| PWM Pins | 6 | 15 |
| Analog Input Pins | 6 | 16 |
| UARTs (Serial Ports) | 1 | 4 |
| Flash Memory | 32 KB | 256 KB |
| SRAM | 2 KB | 8 KB |
| EEPROM | 1 KB | 4 KB |
| Clock Speed | 16 MHz | 16 MHz |
| Physical Size | 68.6 x 53.4 mm | 101.52 x 53.3 mm |
2.2 When Do You Really Need a Mega?
Upgrade from an Arduino Uno to a Mega when your project meets one or more of these criteria:
- You need more than 20 I/O pins: This is the most common reason. If you're controlling many LEDs, buttons, servos, or sensors, the Mega is the obvious choice.
- Your code is too big: If the Arduino IDE gives you a "Low memory available" warning or fails to compile due to sketch size, the Mega's 256 KB of Flash memory is the solution.
- You need to talk to multiple serial devices: If your project involves a GPS module, a serial LCD, and a Bluetooth module all at once, the Mega's four hardware serial ports are a lifesaver.
- Your project is a 3D printer or CNC machine: The Mega 2560 is the de facto standard for controlling these machines (often paired with a RAMPS shield) due to its abundance of I/O.
3.0 A Deep Dive into the Arduino Mega 2560 Pinout and Specs
The main attraction of the Mega is its vast array of pins. Understanding the layout is key to using the board effectively.
3.1 The Complete Arduino Mega 2560 Pinout
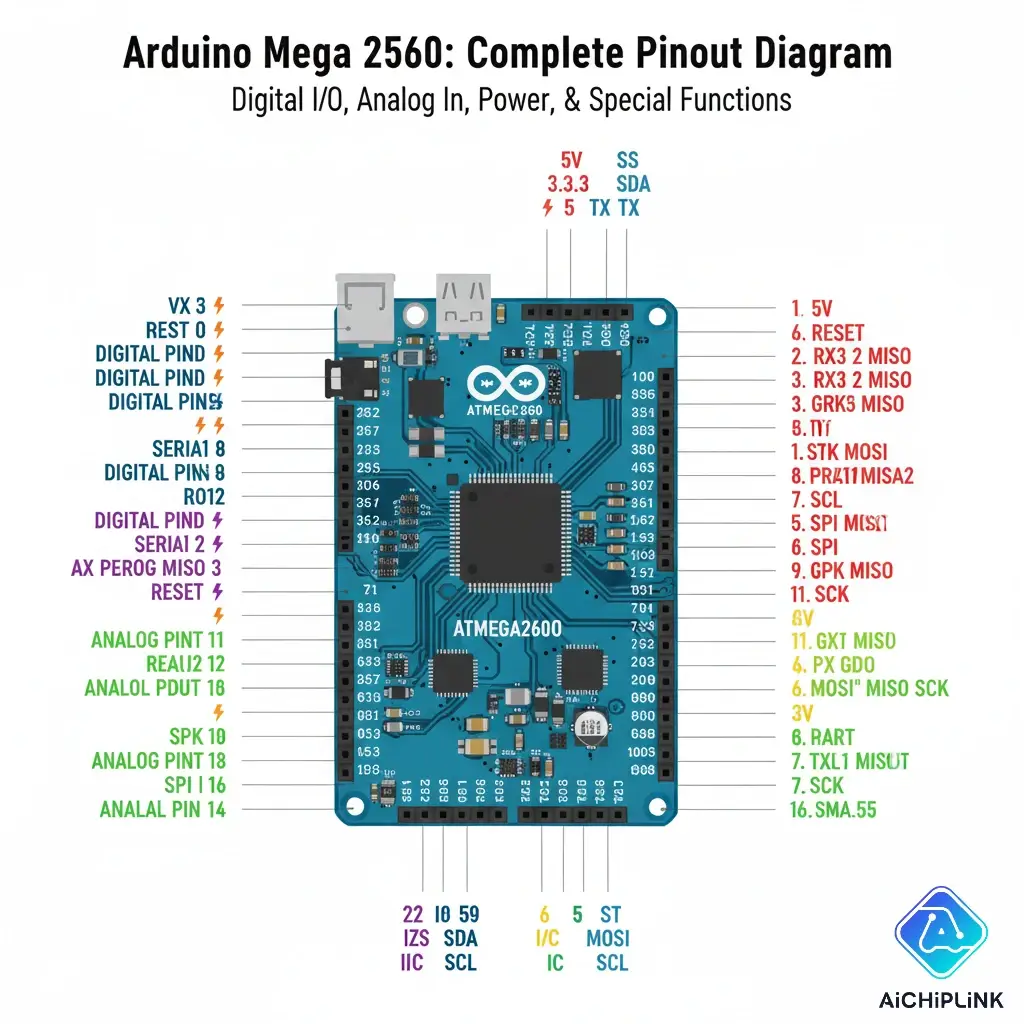
The official documentation on Arduino.cc provides a fantastic interactive pinout diagram for reference.
3.2 Key Technical Specifications (Memory, Power, etc.)
- Flash Memory: 256 KB (8 KB used by the bootloader). This is where your program (sketch) is stored.
- SRAM: 8 KB. This is for storing variables your program creates and uses while it runs.
- EEPROM: 4 KB. This is non-volatile memory for storing data that needs to be saved even when the board is powered off.
- Operating Voltage: 5V.
- Recommended Input Voltage (via barrel jack): 7-12V.
"The Mega 2560 isn't just an Uno with more pins; it's a platform that enables a whole new level of project complexity, from intricate robotics to multi-zone home automation systems."
4.0 Getting Started: Powering and Programming Your Mega 2560
If you're coming from an Uno, the good news is that getting started with the Mega is virtually identical.
4.1 How to Power Your Arduino Mega
You have three main options:
- USB Cable: The simplest way to power the board for programming and small projects.
- DC Power Jack: Use a wall adapter or battery pack (7-12V recommended) for standalone projects. The board has an onboard 5V regulator.
- VIN Pin: Supply a regulated 5V directly to the 5V pin, or a 7-12V source to the VIN pin.
4.2 Programming the Mega (It's Just Like an Uno!)
The programming process is exactly the same as for an Uno.
- Connect: Plug the Mega into your computer with a USB cable.
- Select Board: In the Arduino IDE, go to
Tools > Boardand select "Arduino Mega or Mega 2560". - Select Port: Go to
Tools > Portand select the COM port that the Mega is connected to. - Upload: Write your code (or open an example sketch like "Blink") and click the Upload button. It's that simple!
The Arduino Mega 2560 stands as a true workhorse in the maker community. It takes the simplicity and accessibility of the Arduino platform and scales it up for projects of a much grander scope. When your ideas become too big for an Uno, the Mega 2560 is the clear, powerful, and easy-to-use next step, ready to handle almost any challenge you can throw at it.
Ready to build something bigger? Find the genuine Arduino Mega 2560 and all the shields you need for your next ambitious project at aichiplink.com!
Frequently Asked Questions
What is the main advantage of the Arduino Mega 2560?
The main advantage is its massive number of input/output pins (54 digital, 16 analog). This, combined with its larger memory, makes it ideal for complex projects that have outgrown the Arduino Uno.
Is the Arduino Mega better than the Uno?
"Better" depends on the project. The Mega is more capable, but the Uno is smaller and cheaper. The Mega is the better choice only when your project's I/O or memory requirements exceed what the Uno can provide.
Is the Arduino Mega 2560 hard to program?
No. It is programmed using the exact same Arduino IDE and language as the Uno. If you know how to program an Uno, you already know how to program a Mega.
Are Arduino Uno shields compatible with the Mega?
Yes, most shields designed for the Arduino Uno R3 pin layout will work with the Mega. The Mega has the standard Uno headers in the same position, plus additional headers for its extra pins.
What are some popular projects for the Arduino Mega?
The Arduino Mega is extremely popular for projects that need to control many components at once. Its most famous applications are in **3D printers** (like the RepRap project) and **CNC machines**. It's also a top choice for complex robotics, multi-sensor arrays, and home automation control hubs.