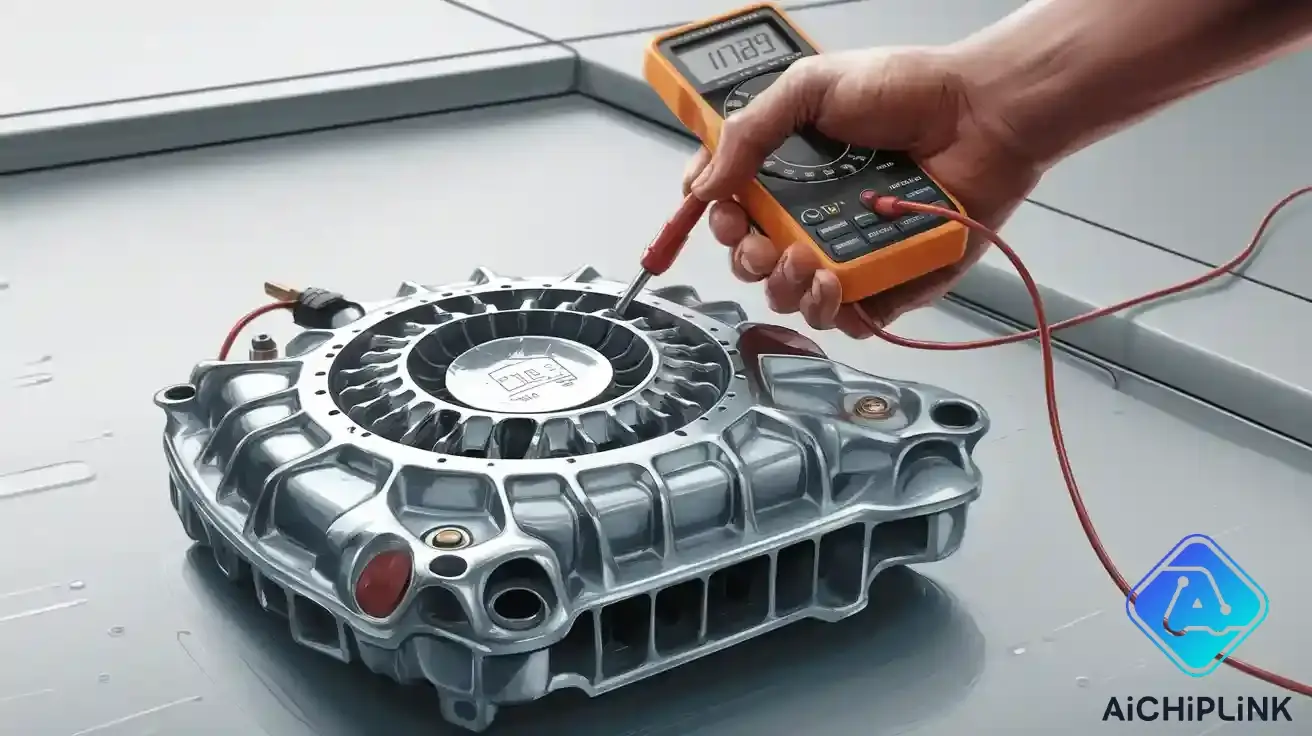
You can test the transmission sensor to see how well it functions using a simple multimeter. This test transmission sensor process helps you determine if the sensor sends the correct signal to your transmission control system. Always wear safety gear and follow your vehicle manual for the proper steps. Being careful prevents damage and keeps you safe.
Key Takeaways
-
Always get your tools ready and put on safety gear before you test your transmission sensor. This keeps you and your car safe.
-
Find the transmission sensor and look at its wires and connectors. Check for any damage or dirt before you start testing.
-
Set your multimeter to the right mode, like resistance or voltage. Follow your car manual’s steps when you test the sensor.
-
Look at your multimeter readings and compare them to your manual. This helps you know if the sensor works or if you need a new one.
-
If you fix or change a bad sensor, use an OBD-II scanner to clear error codes. Then drive your car to make sure the problem is gone.
Preparation for Test Transmission Sensor
Tools Needed
Get all your tools before you start. The right tools make the job easier and safer. Here is what you need:
-
Digital multimeter (for checking voltage and resistance)
-
Safety gloves (to keep your hands safe)
-
Eye protection (to protect your eyes from things that fly)
-
Vehicle owner’s manual (to find the sensor and its details)
-
Screwdrivers or socket set (to take off covers or panels)
-
Clean rag (to clean off dirt or oil)
Tip: Put your tools in a tray or toolbox. This helps you grab what you need fast when you are troubleshooting.
Safety Steps
You must be safe when you test transmission sensor parts. Protect yourself and your car. Do these steps first:
-
Park your car on a flat spot and turn off the engine.
-
Take the key out so the car cannot start by mistake.
-
Let the engine cool if it was running. Hot parts can burn you.
-
Always wear safety gloves and eye protection.
-
Unhook the negative battery cable. This keeps you from getting shocked and keeps you safe while troubleshooting.
-
Read your vehicle manual. It tells you where the sensor is and gives you the right details for your car.
-
Make sure the area near the sensor is clean. Dirt can mess up your check.
Note: Always do what your vehicle manual says. Every car can have different steps or sensor spots.
Getting ready helps you not make mistakes. Good prep also makes troubleshooting faster and helps you test transmission sensor parts better.
Locate Transmission Speed Sensor
Find the Sensor
You need to find the transmission speed sensor before you can test it. Start by opening your vehicle’s hood and looking for the transmission. Most cars have the transmission speed sensor mounted on the transmission case. You may see it near the output shaft or close to where the driveshaft connects. Some vehicles call this part the output shaft speed sensor. Your vehicle owner’s manual will show you the exact spot. If you cannot find it, look for a small plug with wires coming out of the transmission. This is often the sensor you need.
Tip: Use a flashlight to help you see tight or dark spaces around the transmission.
You may also hear the transmission speed sensor called a vehicle speed sensor. Both names mean the same thing in many cars. Always check the sensor location in your manual because different models place it in different spots. Once you find it, make sure you have enough room to reach it with your tools.
Inspect Wiring and Connectors
Before you test transmission speed sensor parts, check the sensor and its wiring. Look at the wires that connect to the sensor. Make sure they do not have cracks, cuts, or melted spots. Check the sensor connector for dirt, rust, or loose pins. Damaged wires or dirty connectors can cause false readings when you check the sensor.
Use a clean rag to wipe away any oil or dirt. If you see green or white powder on the connector, this means corrosion. You need to clean it before you continue. Always check the sensor and wiring before you use your multimeter. Good connections help you get the right results when you test transmission speed sensor function.
Note: If you find broken wires or heavy corrosion, fix these problems first. Testing a damaged sensor or connector will not give you the right answer.
How to Test Transmission Speed Sensor
Disconnect the Sensor
Start by making sure your car is off and the battery is disconnected. Find the transmission speed sensor you located earlier. Use your hands or a small tool to gently unplug the connector from the sensor. Do not pull on the wires. Hold the connector itself. If you see any clips or locks, press or lift them to release the connector. Set the connector aside so you can reach the sensor terminals.
Tip: Take a photo of the sensor and connector before you unplug them. This helps you remember how to reconnect everything later.
Set Up the Multimeter
Now you need to get your multimeter ready. Turn the dial to the correct setting. If you want to check resistance, set the multimeter to the “Ω” (ohms) symbol. If you want to check voltage, set it to “V” for volts. Most transmission speed sensors use resistance tests, but some use voltage. Check your vehicle manual to see which test you need.
-
Plug the black lead into the “COM” port.
-
Plug the red lead into the “VΩ” port.
-
Make sure the leads are not damaged.
Place the multimeter near the sensor so you can reach both easily. This setup helps you test transmission sensor parts without trouble.
Measure Resistance or Voltage
You can now begin the step-by-step guide to testing the sensor. Touch the multimeter leads to the sensor terminals. For resistance, touch one lead to each terminal. Read the number on the screen. For voltage, you may need to reconnect the battery and turn the ignition to “ON” (do not start the engine). Then, touch the leads to the sensor terminals as your manual shows.
-
If you see a number close to zero, the sensor may have a short circuit.
-
If the number is very high or shows “OL,” the sensor may have an open circuit.
-
For voltage, check if the sensor gives a steady signal as you spin the wheel or shaft.
Note: Always follow your manual for the right test. Some sensors need both resistance and voltage checks. This helps you find any fault in the sensor.
Compare Readings to Specs
After you finish the test, compare your results to the numbers in your vehicle manual. The manual lists the correct resistance or voltage for your transmission speed sensor. If your reading matches the specs, your sensor works well. If your reading is too high, too low, or does not change, you may have a faulty speed sensor.
| Test Type | Good Reading (Example) | Faulty Reading (Example) |
|---|---|---|
| Resistance | 500-1500 Ω | 0 Ω or OL |
| Voltage | 0.5-1.5 V (varies) | 0 V or no change |
If you find a fault, you need to replace the sensor. A faulty speed sensor can cause shifting problems, warning lights, or poor performance. If you are not sure about your results, repeat the test or ask a professional for help.
Troubleshooting Tip: If your readings are off, check the wiring and connector again. Sometimes, the problem is not the sensor but a loose wire or dirty contact.
Knowing how to test transmission speed sensor parts helps you find problems early. This troubleshooting process saves you time and money. If you find a faulty speed sensor, fix it soon to avoid bigger issues.
Test Transmission Range Sensor
Check Sensor and Encoder Wheel
You need to check the transmission range sensor before you test it. Start by finding the sensor on your transmission. Most vehicles place the transmission range sensor near the gear selector or on the side of the transmission case. Look for the encoder wheel if your sensor uses one. The encoder wheel helps the sensor know the gear position. Make sure the encoder wheel is clean and not damaged. Dirt or broken teeth can cause the sensor to send the wrong signal.
Tip: Use a flashlight to see the encoder wheel and sensor clearly. Clean off any dirt with a soft cloth.
If you see damage or heavy dirt, fix these problems first. A clean and working encoder wheel helps the transmission range sensor do its job.
Measure Resistance
Now you can test the transmission range sensor with your multimeter. First, disconnect the sensor’s wiring harness. Set your multimeter to the “Ω” setting. Touch the leads to the sensor terminals as your vehicle manual shows. Each gear position may have a different resistance value. Move the gear selector through each position and write down the readings.
-
Compare your numbers to the chart in your manual.
-
If the readings do not match, you may have a faulty transmission range sensor.
| Gear Position | Expected Resistance (Example) |
|---|---|
| Park | 1,000 Ω |
| Reverse | 800 Ω |
| Neutral | 600 Ω |
| Drive | 400 Ω |
Note: Always use the specs from your manual. Different cars use different values.
Verify Supply Voltage
Some transmission range sensors, like Hall effect sensors, need power to work. You must check the supply voltage. Reconnect the sensor, then turn the ignition to “ON” (do not start the engine). Set your multimeter to “V” for volts. Touch the leads to the power and ground wires at the sensor connector.
-
You should see a steady voltage, usually between 5 and 12 volts.
-
If you do not see voltage, check the wiring and fuses.
A missing or low voltage can stop the transmission range sensor from working. If you find a problem, fix the wiring or replace the sensor. A faulty transmission range sensor can cause shifting problems or warning lights.
Alert: Always follow your manual for the right wires and voltage values.
Results & Next Steps
Interpret Readings
You have finished testing the sensor. Now you need to look at your multimeter readings and decide what they mean. If your numbers match the specs in your manual, your sensor works well. If you see a big difference, you may have found a fault. A faulty speed sensor often causes shifting problems, warning lights, or strange readings on your dashboard. You might notice symptoms of faulty transmission speed sensor like rough shifting or the speedometer not working. If you see these signs and your test shows a fault, you have found the problem.
Use this table to help you decide:
| Reading Type | Good Result | Fault Found |
|---|---|---|
| Resistance | Matches specs | Too high, too low, or OL |
| Voltage | Steady and correct | No change or zero |
If you find a fault, replace the sensor. If you do not see a fault, check the wiring again. Sometimes, the problem hides in the wires or connectors.
Clear Error Codes
After you fix or replace the sensor, you need to clear any error codes from your transmission control system. Use an OBD-II scanner to erase the codes. This step helps your car’s computer reset and learn the new sensor. If you skip this, old codes may stay and cause more troubleshooting problems. Always clear codes after you finish repairs.
Tip: If you do not have a scanner, many auto parts stores will clear codes for free.
Test Drive and Confirm
Take your car for a short test drive. Watch for symptoms of faulty transmission speed sensor, like warning lights or shifting issues. If your car drives smoothly and no lights come on, you fixed the fault. If you still see problems, repeat your troubleshooting steps. Sometimes, you need to check the transmission range sensor again. Always use OEM or high-quality replacement sensors. Cheap parts can cause another fault and more trouble later.
Note: Good troubleshooting and the right parts keep your car running well.
You can check your transmission sensors with a multimeter by doing these things:
-
Get your tools and safety gear ready.
-
Find the sensor and look at the wires for damage.
-
Use your multimeter to test resistance or voltage.
-
Look at your results and compare them to your manual.
-
Change any bad sensors and erase error codes.
-
Drive your car to make sure you fixed the problem.
Safety is very important. If you are not sure or your car still acts up, ask a professional for help.
FAQ
How do you know if your transmission sensor is bad?
You may notice warning lights, rough shifting, or your speedometer stops working. If your car has trouble changing gears or shows error codes, the sensor might be faulty. Testing with a multimeter helps you confirm the problem.
Can you drive with a faulty transmission sensor?
You can drive for a short time, but it is not safe. A bad sensor can cause shifting problems or damage your transmission. You should fix or replace the sensor as soon as possible.
What setting should you use on a multimeter for testing sensors?
Set your multimeter to “Ω” for resistance or “V” for voltage. Your vehicle manual tells you which test to use. Always check the manual before you start testing.
Do you need to disconnect the battery before testing?
Yes, always disconnect the negative battery cable before you test. This keeps you safe from electric shock and protects your car’s electronics.

Written by Jack Elliott from AIChipLink.
AIChipLink, one of the fastest-growing global independent electronic components distributors in the world, offers millions of products from thousands of manufacturers, and many of our in-stock parts is available to ship same day.
We mainly source and distribute integrated circuit (IC) products of brands such as Broadcom, Microchip, Texas Instruments, Infineon, NXP, Analog Devices, Qualcomm, Intel, etc., which are widely used in communication & network, telecom, industrial control, new energy and automotive electronics.
Empowered by AI, Linked to the Future. Get started on AIChipLink.com and submit your RFQ online today!


